Showing posts with label 30mm. Show all posts

Sunday, December 31, 2017

MOAR Terrain!

Lord help me I like painting buildings now. Not sure why, maybe it's the jump from miniatures and it's such a different type of painting that it's been apealing in a form of new expression? Perhaps it's the desire to not have to leave my house to play games on nice boards covered in nice terrain pieces with fully painted armies?

Either way.... Here is the latest block of resin I've painted up from Table Top World. I belive this is the humble Cottage II. It was a lot of fun, I tried to do a bit of OSL coming from the window onto the sack of some sort of fruit things. I think it came out well. I'm not gonna list the paints used, as they are the same as the last buliding I did (so if you are that interest just keep scrolling down the screen and you will find it).


Up next is the BIG ONE. So stay tuned.....

Sunday, October 1, 2017

Well Borka is finally done!

I had a rare few hours today to actually get some painting done. I know it was strange being able to sit down, clear my mind, clean my brushes and actually paint!.

I'd love to give you my normal breakdown on what paints I used/mixed to get the colors I did. I honestly didn't take the time to write them down. I will say that I broke out the Scale 75 paints to do the leathers. This is the first time I've used them, and I am happy to report that the do live up to the hype.


So with out further ado....... I give you Borka!


Saturday, September 2, 2017

Borka Bust 2.0

Well I finally had a little bit of time to work on this one. I love the simplicity of the sculpt. It's not that it lacks detail, it just does the job without an inane amount of filigree and other silly stuff like ropes made out of skulls and other non-sense we tend to see on models.

Anywho.... For this model I've used the SOTAR 20/20 and the more I use it the more I fall in love with the thing, but that's a story for another blog post. I started the skin tone with P3 -Troll Blood Base. Then moved on to the leather and fur collar. I set down a base of Scale 75 - Red Leather. This is the first time I have had a chance to use the Scale 75 paints and they are just smooth and cover well through the airbrush. For the fur on the coat I used Scale 75 - Blond.  For the shoulder armor I covered it in Vallejo Model Air - Steel. I had hoped that was gonna be a bit darker but it shines so bright, so I'll have to knock that down a bit.

Well ya made it through all words, so have some pictures.


Saturday, August 5, 2017

Nemo 5.0

Well It was more work time on the Nemo bust. I continued to work on the skin, more and more glazing to get the shading and highlighting right. I'm happy with where the skin tone is now. I tried something different and funky with the eyes on this one. I went all "Storm" and tried to get a glow from the eyes, like there was some kind of magic happening. I'm not sure if I like it or not, so we shall see if it stays of if I blow it out and redo it normally.

Other than that, highlights were added to the golds, the purple and the silvers. a bit of wash was applied strategically on the armor. and well here are the pics.


Tuesday, August 1, 2017

Nemo 4.0

This one is slowly coming along. Tonight I was able to put a bit of time in on the face, hair, and metals.

The skin tones are coming along, I think I may have over did the highlights a bit, so I will have to go back and blend them in so that it becomes a smooth transition. Also looks like I need to add higher highlights on the hair based on the pictures it looks to be blending in. Aside from that I'm really happy with how the metals are turning out. The P3 pig iron on the screws looks really good with the rust. I still need to highlight up and blend into black in spots. The rust and metal mix looks better than I had imagined it would at this stage.

So yea lots more to do before school starts back up in a few weeks.


Friday, July 21, 2017

Nemo part 3.

Well things are moving along with this bust. I'm still happily surprised with how smooth and almost easy it is to paint this thing. The lines are just nice and crisp, the edges are defined well. I kinda wish everything was as nice to paint as this one.

With that all out of the way, lets get down to some painting.

I started by grabbing the silly putty to mask off the face. I used a sculpting tool to push the putty away from the face and into the crevasses so that I had a clear shot to the face with the airbrush. It's almost funny how much it looks like a shroud.


After that I used Reaper Masters Series Olive Drab as the base color for the skin tone. Then moved on to a glaze of Reaper Masters Series Tanned Flesh. After that dried I hit it with the Tanned Flesh Highlight (again watered down to a glaze). 


Up next will be to darken the shaded parts of the face and bring up the highlights a bit more, but that's all for the next installment. 


Thursday, July 6, 2017

Nemo update 1.

Well this guy is coming along nicely. I decided that the end goal is going to look as though Nemo has seen some better days. With that in mind I started out with a rust under coat. I'll be using the hair spray technique on this one. I feel that it gives a real feel with depth to the rust and pitting in the armor.


Here you can see that I started with a base brown and worked up different spots to almost an orange. It's important to vary the colors of your browns as it is both visually stimulating and mimics what rust actually looks like.

Next up was a heavy layer of gloss varnish. This is important. It needs to be heavy to protect the rust layer for whats to come down the road.

After the varnish had time to cure (about 8 hours) It was time to coat the model in hair spray. As I've said time and again, you must use the cheap stuff. Aqua Net all the way. Don't go and steal your significant others (or even your own) fancy smells good stuff. We need the cheap stuff that almost instantly activates when wet.

I let the hairspray dry overnight. While it does not require anywhere near that long to dry I was tires and hit the sack.

Next up it was time to base coat. The standard paint job for this sculpt and pretty much all Cygnar is blue..... I am not going blue. It's just boring to me. I wanted an almost yellowish green look for this one and started with a nice base coat. One thing to keep in mind is that the hairspray will activate with water. So when working over it you must keep moving your airbrush and build up the layers slowly. This takes time but it is worth it. With the base coat laid down It was time to apply the highlights. I basically took my base coat and added white till I was happy that there would be enough contrast and even help bring out a bit of shadow.


And not it's time to let everything dry. Next up will be paint chipping and weathering around the rust. 


Saturday, July 1, 2017

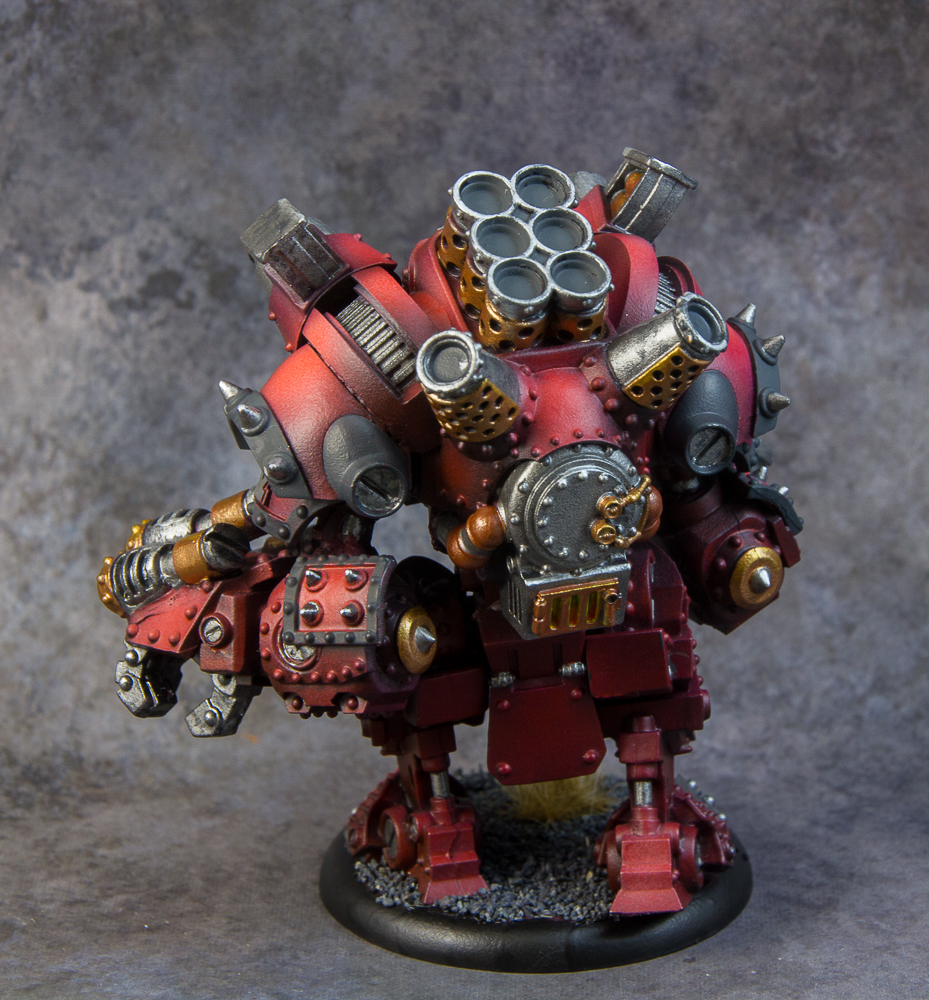
The new Behemoth!

Well Privateer Press actually managed to really impress me with an updated version of a classic model. The old Behemoth was clunky and top heavy with tiny legs (think body builder who skips leg day). When the new model came out I was a bit skeptical of replacing my already bought and painted version, however fate intervened and my old model decided that even with pins it was time for the metal twigs it called legs to let go.

So here we are with the new and improved Big B. I love the way it protrudes bulk. They really nailed it on the head with the proportions and really looks menacing. When I think of a giant stompy robot in a steampunk setting this is most definitely what my mind goes to.

Without further ado I give you my version of the Behemoth (also scroll through the pics for a look at the old one).


And as mentioned above here is my old one. Please note this is before I had a light box or a real camera or really knew what I was doing when painting.


Tuesday, December 6, 2016

I'm Back.....................................!

So nursing school is quite literally the time suck from hell, with all the reading, and studying and doing of papers, it really has killed my hobby time.

So with the semester coming up shortly to the end I am starting to see little rays of sunshine through the end of the tunnel (let's hope it's not just a train!).

I decided that I could take a few nights to paint and man was it so nice to slide into the chair, dust off some brushes and get to painting.

I did up a GW model as I haven't worked on one in ages. I don't know what this thing is but I am sure one of you fine readers will be able to tell me in the comments. As it did not take terribly long to finish I also knocked out a Privateer Press model for the heck of it.

Well OK, Have some pics, I have to go study.


Saturday, October 22, 2016

Nursing School blues.....

It's just not fun when there is no time to paint. So last night I made an executive decision and took an our out of my schedule to slap something onto a model. I wanted to actually finish something and found a single pose model that had a decent amount of detail that would be easy to do up real quick without spending hours on minutia.

And with that I give you Kovnik Joseph, fondly referred to as Uncle Joe.


Saturday, October 1, 2016

The Death Stalker.

So this guy is just about done. All she really needs is a bit of building up under the foot on the base. It was a fun model to work with, and I got to try a new thing using a ton of different blues to create the hues I was going for.

So I'd type more words here, but I just finished a 20 page paper for school..... Just look at the pictures and stop judging me!