Showing posts with label Patriot 105. Show all posts

Sunday, October 1, 2017

Well Borka is finally done!

I had a rare few hours today to actually get some painting done. I know it was strange being able to sit down, clear my mind, clean my brushes and actually paint!.

I'd love to give you my normal breakdown on what paints I used/mixed to get the colors I did. I honestly didn't take the time to write them down. I will say that I broke out the Scale 75 paints to do the leathers. This is the first time I've used them, and I am happy to report that the do live up to the hype.


So with out further ado....... I give you Borka!


Sunday, August 27, 2017

Borka Kegslayer.

Well Privateer Press did it again. Another fantastic bust came out at Gen Con. This time a Troll Blood. Well I've never actually painted a troll so I figured why not? It's a bust, it's a troll, it seems like a really fun sculpt..... and Bob's yer uncle!


For those unfamiliar with the Bust here is the box art.


The resin is the normal PP stuff, its hell to remove mold lines from with anything other than file rods (those awesome things from Tamiya).  There was a good bit of flash and vent resin left over on this one. 


Sadly There was also a bit of mold slip, which I apparently did not manage to get a picture of... and a few small bubbles on the back of the head behind the quills (which will fill in just fine with primer).

I did set a pin in the shoulder for the armor, more out of habit than anything else. Ok to be honest I started drilling before thinking....


Well now it's all primed up and ready to get going. Just gotta wait for the primer to cure.

Saturday, August 5, 2017

Nemo 5.0

Well It was more work time on the Nemo bust. I continued to work on the skin, more and more glazing to get the shading and highlighting right. I'm happy with where the skin tone is now. I tried something different and funky with the eyes on this one. I went all "Storm" and tried to get a glow from the eyes, like there was some kind of magic happening. I'm not sure if I like it or not, so we shall see if it stays of if I blow it out and redo it normally.

Other than that, highlights were added to the golds, the purple and the silvers. a bit of wash was applied strategically on the armor. and well here are the pics.


Saturday, July 1, 2017

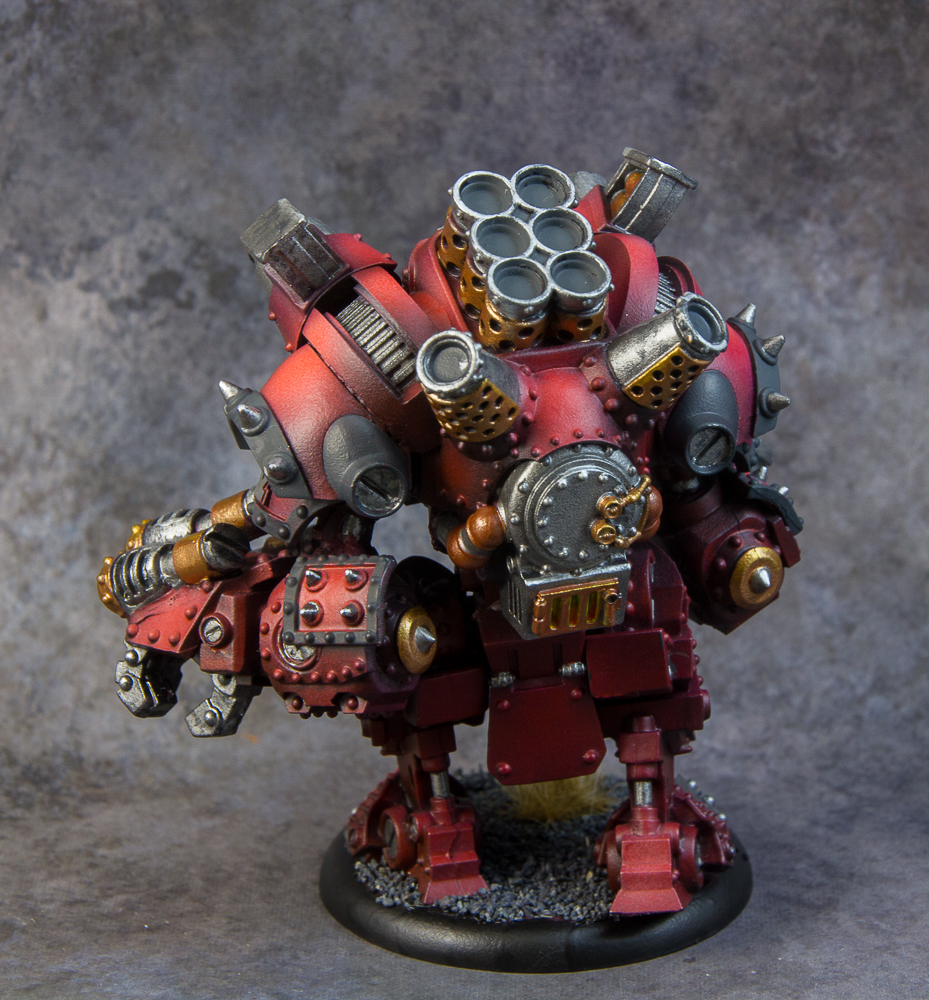
The new Behemoth!

Well Privateer Press actually managed to really impress me with an updated version of a classic model. The old Behemoth was clunky and top heavy with tiny legs (think body builder who skips leg day). When the new model came out I was a bit skeptical of replacing my already bought and painted version, however fate intervened and my old model decided that even with pins it was time for the metal twigs it called legs to let go.

So here we are with the new and improved Big B. I love the way it protrudes bulk. They really nailed it on the head with the proportions and really looks menacing. When I think of a giant stompy robot in a steampunk setting this is most definitely what my mind goes to.

Without further ado I give you my version of the Behemoth (also scroll through the pics for a look at the old one).


And as mentioned above here is my old one. Please note this is before I had a light box or a real camera or really knew what I was doing when painting.


Sunday, February 5, 2017

Busting out!

Ok silly title aside.... I got a bit of work done on the orc bust today.

The first thing to do was set up where I wanted the highlights to be, for a model this size I really just used where the light fell on the model, which made it rather easy. I used Vallejo Game Color - Pure White for this one. I figured with the greens and yellows that were to be applied I did not want to go with a rosy skin town for the highlights.


Once that was dry it was time for the first ink layer. For this I used FW Artists inks - Green. Using the airbrush set at a low psi (about 8) I started just moving it around till I got the saturation I was looking for. The hard part is to get coverage without going too dark and covering up the highlights while making sure you get full coverage on the model. 


This is what it looked like after the first green was applied. You can see that there is a bit of highlight and some dark but it's not terribly differentiated. Again I used the Pure white to touch up the highlights 


Then it was time to apply the second layer of green. I wanted something a bit lighter than just a standard green so I mixed FW- Yellow with the FW-Green and thinned it to just about a water consistency. Which leaves us here. 


After that it was time to put on the first coat of Gloss Varnish and let it cure over night. 

Oh and I did a bit of work on the hair. Which if we are honest kinda looks like a red worm right now......


Tuesday, January 31, 2017

Day 2 of the bust.

So the build went well, and it was time to prime. And oh man did I prime. It took a full cup on my Patriot 105 to prime this guy. For this one I am using the Badger Stylrenz black primer. I switched over from Vallejo Surface Primer a few models back and it's like night and day. The difference is like when you go from a rattle can primer to an airbrush primer if that tells you anything about how good this stuff is.

The lessons learned on this day are a few. First and foremost the bust is too big for a normal holder. As it has that bit of round at the bottom I figured it would suffice. Well...... not so much. The bust is a bit heavy on top and it made maneuvering a bit wonky. You will also notice that I went ahead and attached the shoulder piece to the bust. I debated painting it as a separate piece but the way the angels come together it made more sense to go ahead and just put it together first. I did leave the hair off as it is going to be a nice bright red and I figure it will be much easier to just slide it into the slot later and not have to worry about over spray or under spray with taping.

The next step will be to go a head and add the under highlights. As this one is going to be a sickly green I am going to deviate a bit from my standard. I'll be using a series of whites and yellows for the undertones which should (in theory) set up a really nice nasty green when I shoot the green ink onto it.

So here it is. All black primed and curing over night.


Tuesday, December 20, 2016

Warhammer Quest - The start of a journey though a box.

I was given a copy of this set a few months back and have had no time to paint. I've been counting down the weeks till the end of the semester. So as it's Finals Week and I have only two left I figured after a day of reading and review for 8 hours I deserved to treat myself to some painting.

It's been a while since I've worked on a GW model and frankly it's a bit weird. I'm so used to metal or resin models that these things just feel like nothing in the hand (think ice cream cone vs cotton candy). It is kinda nice that they stay on holders with just a small bit of blue tac though.

Anyway I am starting with the Knight thing and what I thought were blue and pink horrors, I looked back at the box AFTER getting the pink where I wanted it to realize that these are actually also blues so they will have to be changed.

So stay tuned. The blog is back, the updates will be regular and my goal is to knock out the 40ish models in the box over Christmas break!

Here have some extremely early WIP pics.


Sunday, September 18, 2016

Slow and steady wins the race!

With nursing school, my kids all in school, and my wife in school as well (let's not forget about working while we are at it!). It's been a rare gem to find time to paint.

That being said, clients must be a priority as well. I started working on a clients Privateer Press, Legion model called the Strider Death Stalker. First thing to know that this model is really cool. It has just enough detail to make it interesting, without going overboard and making it a burden to paint and look at. The simplicity of the model also means that doing it right comes down to highlights shading and color choices (but don't they all really?).

To start the models were cleaned and pins were set into place. The nice thing about these little gems of white metal is the fact that it's only two pieces. So the whole body and the bow arm. I decided to paint them separately, as the bow would get in the way of about 1/3 of the body for painting (and of course it's the detail part!). Pins also were put into the feet to attach to the base later.

Ah yes the bases..... I wanted to create something special for these. As they are on 30mm bases there isn't all that much room to tell a story. The client asked for ice theme and I love me some crushed glass. I started out with Secret Weapons Miniature - Swamp bases as they suit my purpose fantastically. They have tree stumps and most importantly a deep lip which makes poring resin a non-messy breeze.

So here are some WIP shots. Stay tuned for more next week.


Please note the resin is still drying on the base so it looks like white soup at this point. 


Sunday, September 11, 2016

Moar Conquest WIP.

Well I was a good boy and got a bunch of my reading done for class, so I decided to treat myself with a few hours of painting. As I am still waiting on my next commission project to get here I chose to keep working on the Conquest.

I started by working on the fire in the boilers. Of course this thing is so big that it has three! Then it was on to working on the blacks, and let me tell you...... there is a lot of black on this guy, not to mention the black needed for undercoating the metalics that are yet to come.

So have some WIP shots and keep painting!


Sunday, August 28, 2016

Lady Aiyana from Privateer Press.

I had some time while waiting on the oil washes for the Blind Walker I am currently doing for a commission. I decided to be productive. In keeping with my "under three hour per model rule (for my own mini's at least)". I wanted to work on something I had set aside and had not really wanted to paint. This young lady stood on the shelf  mocking me in silence. As that would just not do, she was plucked down and the painting began. I have seen some super detailed amazing work on this model in the past, and she is truly deserving of the time and attention that it takes if she is going to be used as a competition piece. She has all the elements that go into producing something quite amazing. I however will be using her in table top army, and she will be seeing a lot of time in battle foam. With that in mind I set out do make something.....nice.

I decided on a very non-traditional paint scheme. I went with Vallejo Game Color - Gory Red for the cape to tie in with the red of my Khador army. The complementary color for red is of course green but I did not want to go all "Christmas" on it. I used a Reaper master series green (which name escapes me right now). And the rest just fell into place. As you can see from the pictures I over exaggerated the highlights a bit. This is to make her stand out on the table top (think three foot rule). Which looks fantastic on the table but not so much in close up pictures.

So here ya go. I nice clean table top quality model that would up taking about two hours in total. Sadly the oil wash was still drying by the time this was done.


Wednesday, August 17, 2016

Learning to speed paint.

Recently I was challenged to spend no more than three hours on a unit or model. The painter who challenged me is an award winning painter and fantastic teacher so I listened intently as he dropped the knowledge. I also realized that I was spending way too much time on models that were destined for the table top as game pieces rather than the display case or entries into competitions. With this in mind I set out to "get er done". I chose the Privateer Press Khador Battle Mechanics as my first trial models. They are one piece models with a decent amount of detail, and something I felt I could do well in the limited time.

A few lessons learned.
1. I kept wanting to get detail into ever nook and cranny. I kept having to remind myself that table top was the goal.
2. Blending. I wanted to so very badly to add depth to the colors. Where as for table top a wash and highlight would do just fine.
3 Keeping to a more simple color pallet. There was no reason to use 30+ colors on the models.

So with all that I think the came out really well. I did them up in about 2 hours and 45 minutes.


Wednesday, July 27, 2016

Devastator Part 1.0

It's time to bust out ye olde rusting again. It's been a good long while and I figured why not give my self a challenge and go with a good dirty rusted out warjack. Not only good and rusty but lets assume that it was white at some point in it's carrier.

The devastator just seemed to fit the bill. It has good flat vertical lines and nice slopes to make run off and rust streaks look good.

So far i have gotten the basic rust chipping added. In my next post you will see the real magic....

so have a little taste.