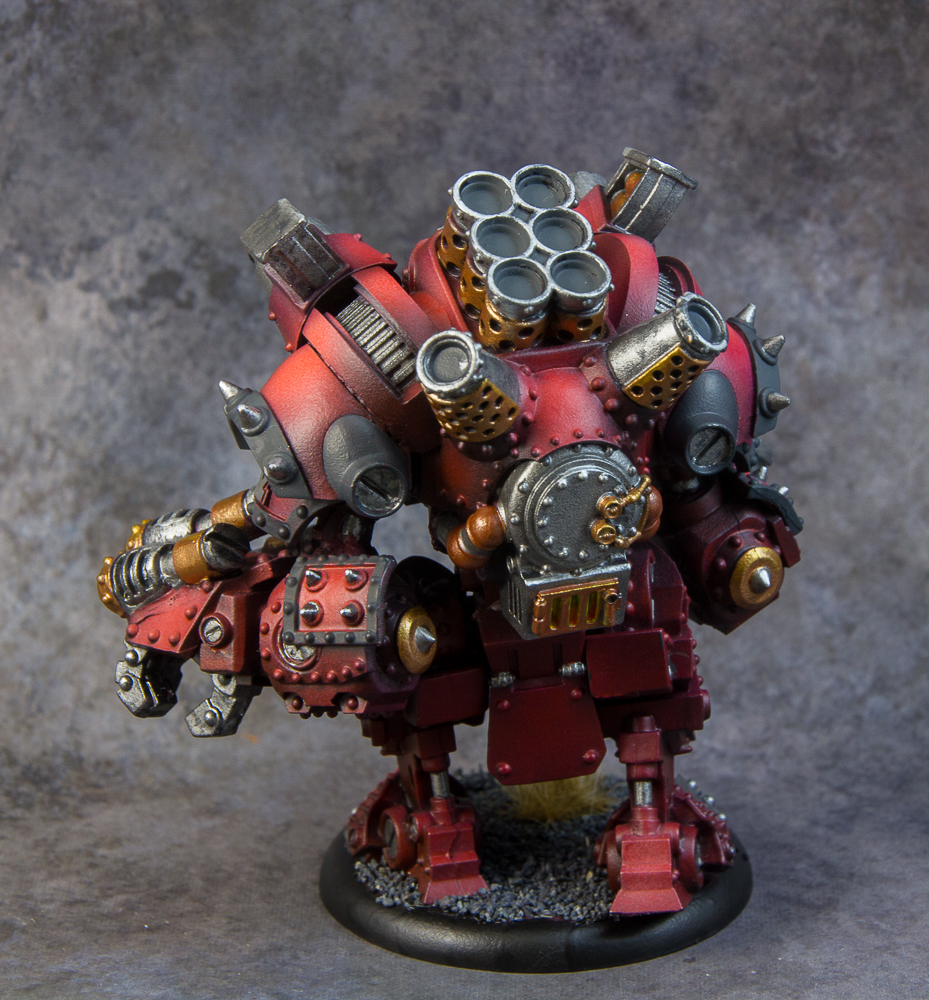
The new Behemoth!
Well Privateer Press actually managed to really impress me with an updated version of a classic model. The old Behemoth was clunky and top heavy with tiny legs (think body builder who skips leg day). When the new model came out I was a bit skeptical of replacing my already bought and painted version, however fate intervened and my old model decided that even with pins it was time for the metal twigs it called legs to let go.
So here we are with the new and improved Big B. I love the way it protrudes bulk. They really nailed it on the head with the proportions and really looks menacing. When I think of a giant stompy robot in a steampunk setting this is most definitely what my mind goes to.
Without further ado I give you my version of the Behemoth (also scroll through the pics for a look at the old one).
And as mentioned above here is my old one. Please note this is before I had a light box or a real camera or really knew what I was doing when painting.
Showing posts with label Khador. Show all posts
Saturday, July 1, 2017
Sunday, February 19, 2017
Some much needed Red.
Hey there folks. I got a bit of time tonight to work on the bust. I was able to start on the red metallic of the shoulder armor. I started by masking off the skin with Silly Putty. That might sound weird but it's a fantastic way to mask, it does not leave any residue and is really easy to get into cracks and crevasse. More importantly it is easy to remove with no issues.
I started with Vallejo Model Air - Steel which is a bit bright for what I normally use but for this I want it to stick out a bit more before bringing it down with glazes later. Once that was dry I used P3 - Red ink and did a nice fine layer leaving most of the metallic shine.
Then it was time for the gloss coat to seal in the freshness.
I had a bit more time so I spent the next 2 hours building this guy. It's the latest large model for Khador from Privateer Press and is also totally in hard plastic on sprue. Which was nice but a heck of a lot of pieces for one large model.
Hey there folks. I got a bit of time tonight to work on the bust. I was able to start on the red metallic of the shoulder armor. I started by masking off the skin with Silly Putty. That might sound weird but it's a fantastic way to mask, it does not leave any residue and is really easy to get into cracks and crevasse. More importantly it is easy to remove with no issues.
I started with Vallejo Model Air - Steel which is a bit bright for what I normally use but for this I want it to stick out a bit more before bringing it down with glazes later. Once that was dry I used P3 - Red ink and did a nice fine layer leaving most of the metallic shine.
Then it was time for the gloss coat to seal in the freshness.
I had a bit more time so I spent the next 2 hours building this guy. It's the latest large model for Khador from Privateer Press and is also totally in hard plastic on sprue. Which was nice but a heck of a lot of pieces for one large model.
Tuesday, December 6, 2016
I'm Back.....................................!
So nursing school is quite literally the time suck from hell, with all the reading, and studying and doing of papers, it really has killed my hobby time.
So with the semester coming up shortly to the end I am starting to see little rays of sunshine through the end of the tunnel (let's hope it's not just a train!).
I decided that I could take a few nights to paint and man was it so nice to slide into the chair, dust off some brushes and get to painting.
I did up a GW model as I haven't worked on one in ages. I don't know what this thing is but I am sure one of you fine readers will be able to tell me in the comments. As it did not take terribly long to finish I also knocked out a Privateer Press model for the heck of it.
Well OK, Have some pics, I have to go study.
So nursing school is quite literally the time suck from hell, with all the reading, and studying and doing of papers, it really has killed my hobby time.
So with the semester coming up shortly to the end I am starting to see little rays of sunshine through the end of the tunnel (let's hope it's not just a train!).
I decided that I could take a few nights to paint and man was it so nice to slide into the chair, dust off some brushes and get to painting.
I did up a GW model as I haven't worked on one in ages. I don't know what this thing is but I am sure one of you fine readers will be able to tell me in the comments. As it did not take terribly long to finish I also knocked out a Privateer Press model for the heck of it.
Well OK, Have some pics, I have to go study.
Sunday, August 28, 2016
Lady Aiyana from Privateer Press.
I had some time while waiting on the oil washes for the Blind Walker I am currently doing for a commission. I decided to be productive. In keeping with my "under three hour per model rule (for my own mini's at least)". I wanted to work on something I had set aside and had not really wanted to paint. This young lady stood on the shelf mocking me in silence. As that would just not do, she was plucked down and the painting began. I have seen some super detailed amazing work on this model in the past, and she is truly deserving of the time and attention that it takes if she is going to be used as a competition piece. She has all the elements that go into producing something quite amazing. I however will be using her in table top army, and she will be seeing a lot of time in battle foam. With that in mind I set out do make something.....nice.
I decided on a very non-traditional paint scheme. I went with Vallejo Game Color - Gory Red for the cape to tie in with the red of my Khador army. The complementary color for red is of course green but I did not want to go all "Christmas" on it. I used a Reaper master series green (which name escapes me right now). And the rest just fell into place. As you can see from the pictures I over exaggerated the highlights a bit. This is to make her stand out on the table top (think three foot rule). Which looks fantastic on the table but not so much in close up pictures.
So here ya go. I nice clean table top quality model that would up taking about two hours in total. Sadly the oil wash was still drying by the time this was done.
I had some time while waiting on the oil washes for the Blind Walker I am currently doing for a commission. I decided to be productive. In keeping with my "under three hour per model rule (for my own mini's at least)". I wanted to work on something I had set aside and had not really wanted to paint. This young lady stood on the shelf mocking me in silence. As that would just not do, she was plucked down and the painting began. I have seen some super detailed amazing work on this model in the past, and she is truly deserving of the time and attention that it takes if she is going to be used as a competition piece. She has all the elements that go into producing something quite amazing. I however will be using her in table top army, and she will be seeing a lot of time in battle foam. With that in mind I set out do make something.....nice.
I decided on a very non-traditional paint scheme. I went with Vallejo Game Color - Gory Red for the cape to tie in with the red of my Khador army. The complementary color for red is of course green but I did not want to go all "Christmas" on it. I used a Reaper master series green (which name escapes me right now). And the rest just fell into place. As you can see from the pictures I over exaggerated the highlights a bit. This is to make her stand out on the table top (think three foot rule). Which looks fantastic on the table but not so much in close up pictures.
So here ya go. I nice clean table top quality model that would up taking about two hours in total. Sadly the oil wash was still drying by the time this was done.
Friday, August 5, 2016
Kommander Harkevich - The Iron Wolf.
Well some of us are not at Gen Con, and still have painting to get done. I have always liked this model and like so many others before it had never really had a reason to get it painted. Now I am kicking myself a bit because of how much fun and how seemingly easy it was to get him looking good. As a side note this one came together pretty quickly. I think I did this in less than 4 hours. So score.
Ok enough talk look at the shiny pictures.....
Well some of us are not at Gen Con, and still have painting to get done. I have always liked this model and like so many others before it had never really had a reason to get it painted. Now I am kicking myself a bit because of how much fun and how seemingly easy it was to get him looking good. As a side note this one came together pretty quickly. I think I did this in less than 4 hours. So score.
Ok enough talk look at the shiny pictures.....
Sunday, July 31, 2016
Don't leave your War Jack out in the snow.
I'm not the biggest fan of seeing a whole army full of weathered, chipped, and beaten up equipment. Real armies in the real world meticulously maintain their weapons (else they stop working). That being said, we paint and play with toys and whimsy so it's all good to have something all beaten down by time.
Taking that into account I wanted to do something completely different from what I have been working on (manly crisp, clean models that look almost showroom new).
I started out by priming the model in grey, then used a dark brown to base my rust, then added more brown reds and finally orange in certain spots to add variety of color like you would see in the real world.
Once done with that step a HEAVY gloss coat was added. This is needed to protect the rust layer so that it does not get stripped off in later steps.
After the gloss coat was fully cured (about 24 hours). I then coated the model with hair spray. Now a word of caution, do not use your wife's fancy expensive hair spray. First the stuff won't react with the water later, and it's almost guaranteed to start an argument.....Go out and grab a bottle of Aqua Net from the dollar store of your choice.
The hairspray only takes about an hour to set. We then proceed to paint the base color onto the model with an airbrush. this requires very light coats of paint at a lower psi as you want to avoid the water in the paint from activating the hair spray.
After all that works it's then time to ruin a perfectly good paint job. I start by taking a paint brush and loading it with water, then basically "paint the mini" with water in a small section, wait a few seconds for the water to activate the hairspray and then use a tooth brush to chip off the paint. When the desired effect is reached take a dry paper towel and dab the part of the model clean. Then move on to the next piece etc till done.
Once the chipping is finished it's time to protect what is already done. I find another heavy coat of gloss varnish to work really well here and it sets up the next step in the process. The wash.... Personally I like to use an oil was for this effect. not only does it flow into the recess better but you can achieve really nice rust streaks with it as well.
After a few hours of the oil drying I then use weathering powder to further diminish the fresh look of the paint. The not quite dry oil wash helps the pigments adhere to the model.
After that a good matte varnish and then you just finish off the details...
See clear as mud right?
So here is the result of all that text.
I'm not the biggest fan of seeing a whole army full of weathered, chipped, and beaten up equipment. Real armies in the real world meticulously maintain their weapons (else they stop working). That being said, we paint and play with toys and whimsy so it's all good to have something all beaten down by time.
Taking that into account I wanted to do something completely different from what I have been working on (manly crisp, clean models that look almost showroom new).
I started out by priming the model in grey, then used a dark brown to base my rust, then added more brown reds and finally orange in certain spots to add variety of color like you would see in the real world.
Once done with that step a HEAVY gloss coat was added. This is needed to protect the rust layer so that it does not get stripped off in later steps.
After the gloss coat was fully cured (about 24 hours). I then coated the model with hair spray. Now a word of caution, do not use your wife's fancy expensive hair spray. First the stuff won't react with the water later, and it's almost guaranteed to start an argument.....Go out and grab a bottle of Aqua Net from the dollar store of your choice.
The hairspray only takes about an hour to set. We then proceed to paint the base color onto the model with an airbrush. this requires very light coats of paint at a lower psi as you want to avoid the water in the paint from activating the hair spray.
After all that works it's then time to ruin a perfectly good paint job. I start by taking a paint brush and loading it with water, then basically "paint the mini" with water in a small section, wait a few seconds for the water to activate the hairspray and then use a tooth brush to chip off the paint. When the desired effect is reached take a dry paper towel and dab the part of the model clean. Then move on to the next piece etc till done.
Once the chipping is finished it's time to protect what is already done. I find another heavy coat of gloss varnish to work really well here and it sets up the next step in the process. The wash.... Personally I like to use an oil was for this effect. not only does it flow into the recess better but you can achieve really nice rust streaks with it as well.
After a few hours of the oil drying I then use weathering powder to further diminish the fresh look of the paint. The not quite dry oil wash helps the pigments adhere to the model.
After that a good matte varnish and then you just finish off the details...
See clear as mud right?
So here is the result of all that text.
Saturday, July 30, 2016
Just a quick War Jack to lighten the mood.
If you have been following along here, on Facebook and a few forums you will know that I have quite a few projects going on at the same time.
Because I don't have enough on my pallet I wanted to finish my new Khador Battle Box as well. So while other models were in different stages of drying, curing etc I painted up one of the Jacks in the Box (ah puns!).
Anyway..... I give you the Decimator (no I don't make up these names, other people get paid lots of money for this kind of magic...).
As a side note I really hate PVC plastic for models. The grooves and mold lines are a nightmare to clean up right.
If you have been following along here, on Facebook and a few forums you will know that I have quite a few projects going on at the same time.
Because I don't have enough on my pallet I wanted to finish my new Khador Battle Box as well. So while other models were in different stages of drying, curing etc I painted up one of the Jacks in the Box (ah puns!).
Anyway..... I give you the Decimator (no I don't make up these names, other people get paid lots of money for this kind of magic...).
As a side note I really hate PVC plastic for models. The grooves and mold lines are a nightmare to clean up right.
Sunday, July 17, 2016
A Kodiak!
Moving forward in my quest to "paint them all", it was time to break out the Khador Kodiak. If you have been reading my blog for a while you will have noticed that I paint a metric crap-ton of red (it's a measurement.... look it up.). I decided to mix it up a bit and go with a more traditional color scheme for the Kodiak.
I used the same technique that I do for reds. in that I used a green ink over highlights. One thing I did learn from this is that the green is less translucent then the red ink so I had to go much more extreme with the under highlights. Overall I am really happy with how it turned out.
Moving forward in my quest to "paint them all", it was time to break out the Khador Kodiak. If you have been reading my blog for a while you will have noticed that I paint a metric crap-ton of red (it's a measurement.... look it up.). I decided to mix it up a bit and go with a more traditional color scheme for the Kodiak.
I used the same technique that I do for reds. in that I used a green ink over highlights. One thing I did learn from this is that the green is less translucent then the red ink so I had to go much more extreme with the under highlights. Overall I am really happy with how it turned out.
Tuesday, July 12, 2016
A new day, a blog, and a new project.
I decided to mix it up a bit and work on something green.
I chose the Khador Kodiak as it's a fun new sculpt and I wanted to do something different. You might remember the Kodiak I did for competition about a year ago.
The one that is being worked on now is going to be completely different. So here are some very early WIP Shots.
I decided to mix it up a bit and work on something green.
I chose the Khador Kodiak as it's a fun new sculpt and I wanted to do something different. You might remember the Kodiak I did for competition about a year ago.
The one that is being worked on now is going to be completely different. So here are some very early WIP Shots.
Wednesday, July 6, 2016
Man O War Shock Troopers.
These are some of the coolest models I have the pleasure of painting. I had liked the look of them for years but were not really game worthy so I held off on picking up a box. With the new rules changes to Warmachine I decided it was time to give it a go.
First things first. The models were easy to assemble with very little mold line clean up, which is atypical for PVC models. The joints were easy and unlike too many models did not require pinning.
All in all it took about an hour to clean up and assemble the bits.
I did these up in a bit of an alternate scheme, sticking with the red of Khador but forgoing the normal silver on the armor as I felt it would distract from the over all Red/Black look I was going for.
So here are the pictures I find that these might be some of the best models I have done to date.
These are some of the coolest models I have the pleasure of painting. I had liked the look of them for years but were not really game worthy so I held off on picking up a box. With the new rules changes to Warmachine I decided it was time to give it a go.
First things first. The models were easy to assemble with very little mold line clean up, which is atypical for PVC models. The joints were easy and unlike too many models did not require pinning.
All in all it took about an hour to clean up and assemble the bits.
I did these up in a bit of an alternate scheme, sticking with the red of Khador but forgoing the normal silver on the armor as I felt it would distract from the over all Red/Black look I was going for.
So here are the pictures I find that these might be some of the best models I have done to date.
Tuesday, June 7, 2016
Karchev Completed.
My God, what a fun model to paint. I loved every bit of working on this one.
So without further ado (and a wall of text).......
The Model!
My God, what a fun model to paint. I loved every bit of working on this one.
So without further ado (and a wall of text).......
The Model!
Labels:
28mm,
30mm,
Airbrush,
Airbrushing,
Badger Airbrush,
Gaming Table. Wargaming,
Inks,
Khador,
Oil Wash,
P3,
pictures. Light box,
Privateer Press,
Vallejo,
Vallejo Game Air,
Wargaming,
Warjack. Khador
Subscribe to:
Posts (Atom)