Showing posts with label Blue Table Painting. Commision Painting. Show all posts
Showing posts with label Blue Table Painting. Commision Painting. Show all posts
Sunday, August 28, 2016
Lady Aiyana from Privateer Press.
I had some time while waiting on the oil washes for the Blind Walker I am currently doing for a commission. I decided to be productive. In keeping with my "under three hour per model rule (for my own mini's at least)". I wanted to work on something I had set aside and had not really wanted to paint. This young lady stood on the shelf mocking me in silence. As that would just not do, she was plucked down and the painting began. I have seen some super detailed amazing work on this model in the past, and she is truly deserving of the time and attention that it takes if she is going to be used as a competition piece. She has all the elements that go into producing something quite amazing. I however will be using her in table top army, and she will be seeing a lot of time in battle foam. With that in mind I set out do make something.....nice.
I decided on a very non-traditional paint scheme. I went with Vallejo Game Color - Gory Red for the cape to tie in with the red of my Khador army. The complementary color for red is of course green but I did not want to go all "Christmas" on it. I used a Reaper master series green (which name escapes me right now). And the rest just fell into place. As you can see from the pictures I over exaggerated the highlights a bit. This is to make her stand out on the table top (think three foot rule). Which looks fantastic on the table but not so much in close up pictures.
So here ya go. I nice clean table top quality model that would up taking about two hours in total. Sadly the oil wash was still drying by the time this was done.
Thursday, February 11, 2016
GW models you say?
Yep, I figured I'd mix it up a bit and work on some Games Workshop stuff.
So this is a tank (I think a Rhino?). I am told that this is a Chaos model so it's going to be all rusted out and nasty looking.
I started with an undercoat of brown/red/orange mix. Once that was dry I hit it with a good coat of Tester's Gloss Coat to seal in the freshness.... Well OK to facilitate the next step in the process. Once the gloss varnish had time (overnight) to cure I then applied a coating of hair spray. I use Aqua Net as its really cheap and water soluble.
Then it was time to add the main colors of the tank. I was going for a split color of white and purple. This step is critical. You need just enough paint to cover the browns, without saturating the hairspray. to do this I turned up the PSI on the airbrush and shot from a bit further away than normal (about 6 inches) so that the paint was just about dry by the time it hit the model.
I started with the white coat of paint. waited for it to dry completely, then masked off the center with painters tape. It was then time to use the purple.
I let everything dry overnight again (nobody said this is a quick process).
And it was then time to activate the hairspray and chip some paint. Doing this is fairly easy. Get a fresh cup of water, a paintbrush and something to chip the paint with. I personally use a straw that has been cut on the bias. It's sharp enough to chip up the paint, but not so sharp that it will cut through the varnish.
Here are the steps for the rust chipping.
1. take your paintbrush and get it good and wet.
2. "paint" the water onto the section you want to chip.
3. wait about 30 second for the water to get under the paint to the hairspray.
4. chip the paint gently with the tool of your choice.
5. when you are satisfied with the level of rust. dry off the area with a clean paper towel.
After the chipping is done it was time to seal the model with another layer of Gloss Varnish.
And you get something like this.
Once the Varnish cures it will be time to work on details, washes, powders and all the fun stuff to ruin a perfectly good paint job!
Thursday, June 4, 2015
Blighted Bather - Finished.
First let me say I love this model. It was so much fun to paint up. I really like all the little details like the bubbles in the cauldron, and the rock like things on her right shoulder, and seriously,.... How cool is the rubber ducky shredder?
I am really glad the client wanted this in a "normal" skin tone. I think it lent great contrast to the other colors.
All that being said. I am still learning to use the new camera and more importantly (and aggravatingly) how to edit said photos. If anyone has a good tutorial out there for Light Box or Photo Shop or any other great piece of software please let me know in the comments.
Here are a few pics.
Also not sure what that smudge on the light box is but that needs to go away.
Thursday, May 21, 2015
Pinning. What is it and why you should do it.
Let's take a moment or three to talk about pinning. If you are putting together metal or resin models you should really be pinning. Here are a few reasons why it makes sense to do so.
1. It keeps that pesky hand/arm/head/backpack etc from falling off on the game table.
2. Number 1 is especially frustrating when it chips the paint.
3. Geez now that I have glued the arm back onto my already painted model I have glue everywhere ruining the paint job I just spent 10 hours on....
4. It's a great way to have something to hold onto if you are painting your models before assembly.
So how do you pin you ask? Pretty easily really. There are a few things you will need to get started.
A good jeweler's pin set. I personally use the P3 version as it's under $10 and the drill bits have been stayed the sharpest and broken the least of the ones I have used. GF9, Army Painter and GW all sell them as well. PRO TIP- STAY AWAY FROM THE GW BRANDED ONE. It cost 3 times as much for the same darn thing. Don't through your money away buy some shiny models with it.
Most of the pin vices come with a few different sized drill bits and a bit of brass rod. I find for most 28mm models that the 0.85mm drill and rods are the right size for the job. If you are going to pin something big and heavy, I use the 1.5mm stuff.
You will also need a good pair of snips. For the longest time I just used an old nail cutter and that worked well for 0.85mm and below. If you are going to pin with anything bigger I would recommend getting a good set of metal snips. Again you can buy these from all the miniature companies, but why pay $20 for something you can pick up at Home Depot, Lowes, Menard's ect for under $10?
I'd like to also talk about using pinning to your advantage during modeling/painting.
I am working an a PP model for a client called the Blighted Bather. This thing is tiny. The body is white metal and the cauldron is resin. I don't know about you but to me that sounds like a disaster waiting to happen if I had just glued it all together.
I started like every other model, cleaning off mold lines and snipping off the odd spru/extra bit of metal. Then it was time to figure out where and with what to pin.
If you look at the model you can see that the metal legs go into the resin and the torso of the model goes into it as well. The "rubber ducky" sits on the base. As I am using a scenic base the ducky will be put into one of the recesses and will have clear resin applied around it to simulate water keeping it secured. I pinned it anyway so that I have something to hold it onto the cork. I then figured out the angle to pin by placing the pieces together and using the drill as a guide. Then its just a matter of drilling into the different pieces. Once the legs and torso have their pins. I take a dab of bright paint and put it on the end of the brass rod, and use the pin as a guide placing it down on the bit that it will be pinned to. This gives me a target to drill into. Drilling then becomes easy. Just make sure to make your hole deep enough 1/8th" should do. For priming and painting I like to put filler rod into the drilled holes. This will keep them free of paint and let me find them easily. Pro Tip - don't glue in your filler rods, just place them in the holes as you will need to remove them later.
Ok here are some pics of what I am talking about.
Here is the pin vice and a leg that is about to be pinned.
Here you can see the legs pinned and the place holder pins in the cauldron.
This has the torso and the ducky on pins in the cork ready for priming and painting.
Well there ya go, Pinning is not hard and it will save you so very much hassle down the road. Please add some comments and questions.
Wednesday, May 13, 2015
Thagrosh Painter of Everblight DONE!!!
Wow, what an amazing model. This one was really fun to paint. I got to try a few new things like using two oil washes of different colors over each other (blue followed by purple) (also a third if we count the burnt umber on the cape) and I think I have the two brush blending down pretty well (see the cape).
I also took the pictures using the new camera. The pictures look fantastic on my computer so hopefully that translates to the blog.
All in all an fantastic model that I will actually be kinda sad to give to it's owner and not put in my display case.
Please, please, please leave some feed back, on the pictures and the model.
Tuesday, May 12, 2015
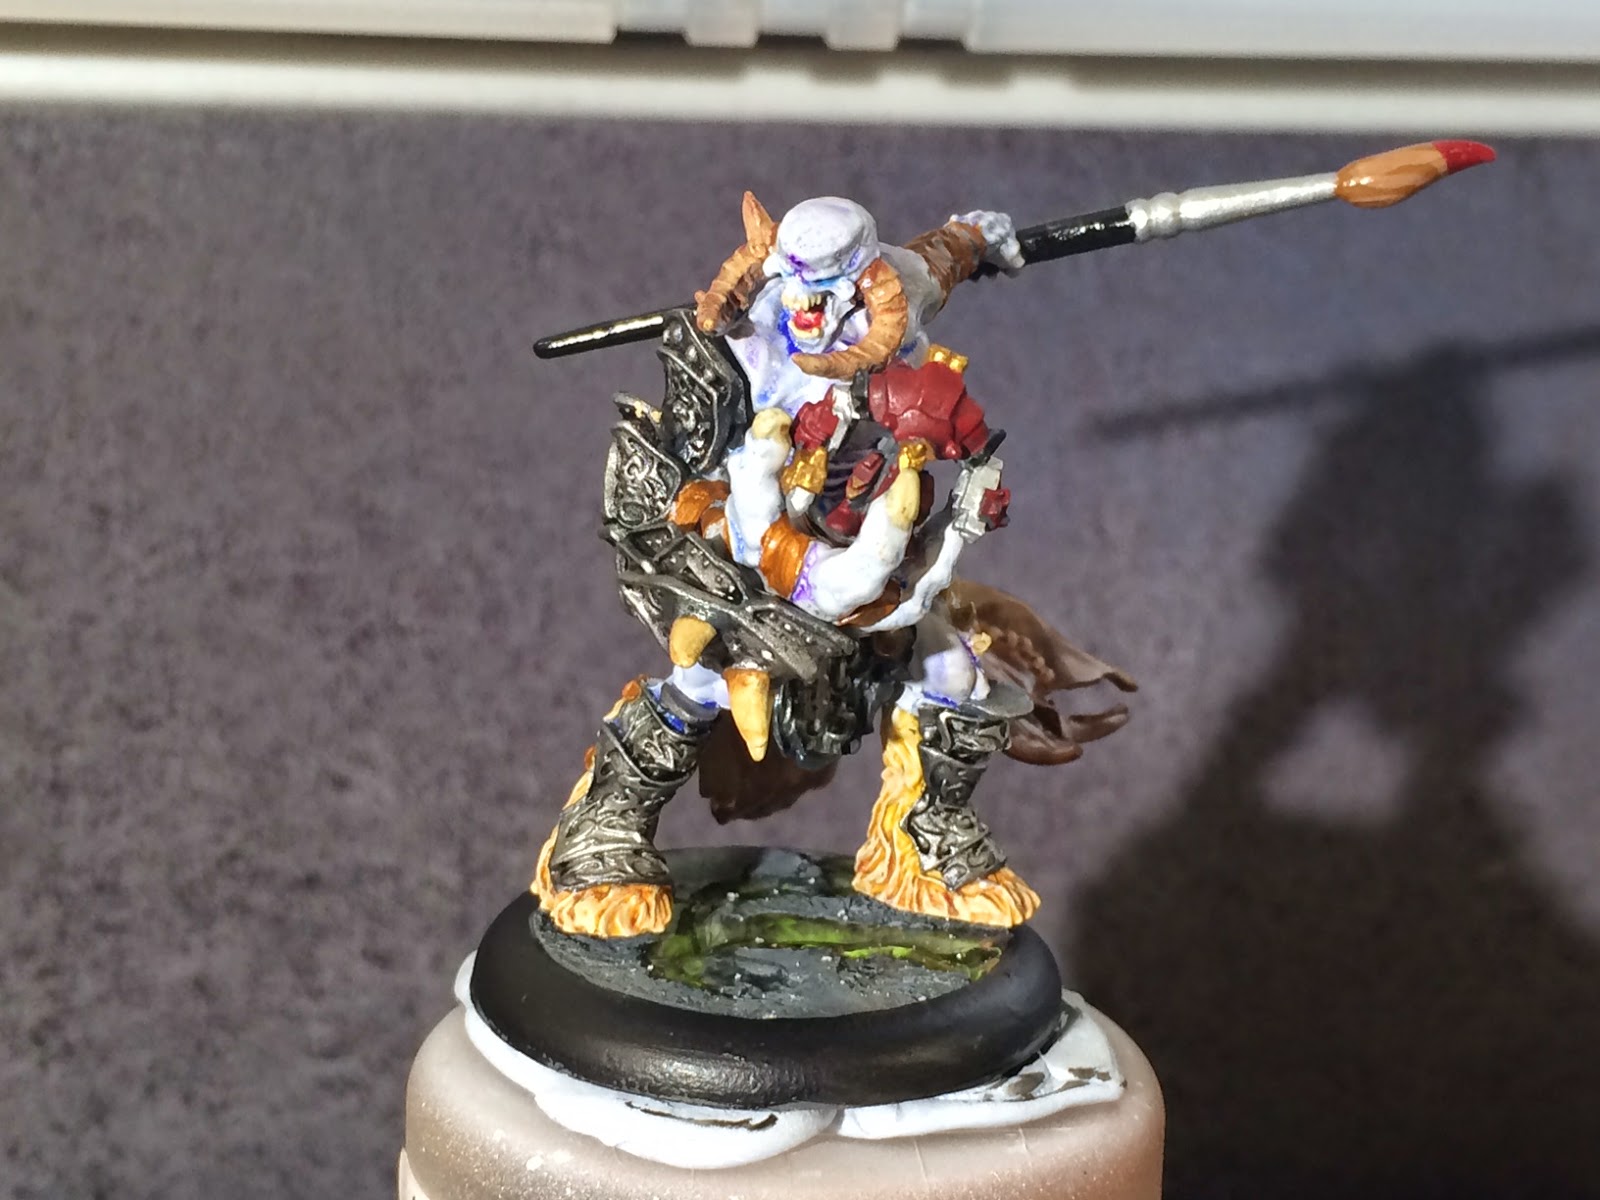
Thagrosh the Painter 4.0
The end is in site! I was able to spend about 8 hours working on this guy today. So here is a shout out to my amazing wife who made that possible.
I blocked in all the armor with Vallejo Model Color - Grey Black, then added a heavy dry-brush of P3 Pig Iron to give it a nice dark metal look. It really brings out the legs and arm. After that I added some P3 Armor Wash which gives it a slightly blueish tinge which really looks fantastic.
I used P3 Blood Tracker Brown on the leather. If you don't own this color go buy some, Its such an amazing base for leathers.
Then it was time to assemble the model. All of the place holder pins where removed and I carefully glued the pins into the holes I had drilled.
After all of that it was time to gloss coat, once dry I used Windsor & Newton Colbalt Blue Hue for the first wash on the skin bringing it from a stone grey to a really nice blue/grey. Once dried I used Windsor & Newton Purple to add a bit of contrast and depth to the blue.
Now the model is sitting in the airbrush booth with the final gloss coat curing. Once dry and done. i'll clean up a few spots. Add the golds and seal it with a matte coat and this bad boy will be done.
Have some pictures..... they're free.
Sunday, May 10, 2015
Thagrosh the Painter 3.0
Well here is a quick update on this model.
I was able to get blending done on the cape. The more I play with two brush blending the more I love it. I'll write up a blog post on how to do it sometime soon in the future. I just need to figure out how to effectively write it up, and lets be honest there are tons of YouTube videos out there on it. So look it up if you really want to see it done.
After the cape, I cleaned up the over spray on the torso and worked the darker browns onto he spiky-bone things and the horns on his head. I also added the first blue to the eyes.
Then all that went into the spray booth for a gloss coat.
I added the second layer of still water to the base as well.
Next up it was time to work on the super tiny Mini-Juggernaut that will sit in his hand. This thing just screams Micro-Machine from back in the day. I got the base colors on it and will work on shading soon.
I also started work on the paintbrush. I'm thinking of making some water slide decals to give the brush a realistic look.
Well that's it for now. This project is a lot of work but I think it will be fantastic when finished.
Saturday, May 2, 2015
Thagrosh Painter of Everblight 2.0
I was able to work on this today. I started with a 5:1 mix of VMC -Dead White and VGC - Stone Grey. This was laid down as the base skin color. I need something whitish that will hold the blue and then purple inks later in the painting process.
After that dried it was time to add the red glow/gore on the torso. I used FW Red ink and shot it through the airbrush at about 5psi.
Then added on P3 Jack Bone for the spikes and nails.
The cape... ah the cape. I used the Jack Bone for the skulls then P3 Blood Tracker Brown, P3 Beast Hide, and another paint that I didn't right down and can't remember for the browns on the cape. Now to let it dry and then I'll start the blending on the cape to really bring out the highlights.
While everything was drying I started working on the base. The stone is drybrushed in stages from black grey up to stone gray. Then I used VMC - Russian Green as the base color and went up to Neon Green to give it a bit of texture. I poured the Still Water in and now that will cure overnight.
Ah yes past the wall of text and now for the pictures.
Monday, December 15, 2014
Indulge me in quick diversion or rant if you will. (This is gonna be a long blog post but I think its worth it).
Let's have a conversation about Professional Painting Services. The good, the bad, the downright deceitful.
As an upfront confession. I used to take commissions locally. I stopped as it was killing my joy of painting. I like to paint what I want, when I want, and having deadlines and painting to someone else's vision just was not for me. I will still do models for friends (see the Knight Titan) but I don't charge for it as it's usually something that I want to paint but don't want to buy (I don't play 40k so why have a model or 12 that look interesting paint wise to me).
First let me define what I think a professional commission painter should do.
1. Communication - It is key, they need to be available to you. They need to ask a crazy amount of questions to really drill down on how to make your vision come to life. You need to be able to speak with the person that will actually be working on your models. This should be a priority for the commission painter as well.
2. Pictures - Lot's and lot's of high resolution stuff, taken in a light box. You should be able to see your models. They should be sending you updates along the way. I highly recommend a test model to see if your vision and what the painter thinks is your vision, are aligned.
3. Attitude - You should get the same level of professional enthusiasm from the quote process to the delivery.
4. Timelines - Delays happen in miniature painting, always. You should expect regular updates without having to ask.
Anyway back on topic. You might have seen the shit-storm that is a brewing over Blue Table Painting. They took a $8000+ commision on a Forge World Chaos Dwarf army and basically butchered it. The owner of the army tried to work with them repeatedly and wound up taking his cause to YouTube (please note this video is long, like an hour long but it shows the whole army and all the problems, he also goes over the contract in detail to be completely transparent).
Apparently Blue Table Painting offered untenable solutions and then rescinded them
Another studio has stepped up to the plate and offered to repaint and fix the models at no charge to the customer and should be praised for being great members of the community.
Front Line gaming is the company that stepped up and is making the army look like it should. Please go to their website and show your support for them.
I would recommend staying away from Blue Table Painting. They have clearly shown time and again that they can not paint to even a table top standard. I would invite you to look at the Blue Table Painting Portfolio. You will notice that the images are very low quality which prohibits zooming in, but also notice that lines are not strait, highlights and washes are over used and blending is quite frankly atrocious.
Now onto the good. There are a plethora (yea I used a big word) of good professional services out there. They genuinely care about making you happy and providing amazingly well painted miniatures.
GMM studios is an example of this. They do amazing work fast. They post very high resolution pics and actively engage the community.
Les Bursly at Awesome Paint Jobs is another fantastic painter. The things he can do with an airbrush are just out of this world. I am not sure if he is taking commissions right now but if he is and you are in the market I would recommend jumping on it.
These guys are my favorites. Some of the things Winterdyne has done just blow my mind. Check out the Titan he did for a client. Just the base alone was enough to make him the man, the Titan it's self is just unreal.
The point is that there are some amazing studios out there doing some incredible work. If you are in the market to have someone else paint your models. Please check around. Don't fall for the Blue Table Painting studio line.