Showing posts with label Warjack. Khador. Hairspray. Show all posts

Saturday, June 17, 2017

A wild post appears!

Let me start off with a BIG apology. It's been about 5 months since my last post, and for that I am truly sorry. I can give you all kinds of excuses but hey I'm back and I have all summer to post pictures and paint models. So let the shenanigans begin.

To start, here is the Khador Conquest. I did this in my normal Inks first style. It was a bit more of a challenge as the larger the model the more light has to "hit" it. It took a few tries to get the shading and highlights to where I was happy with them. Other than that a large model like this is pretty much the same. Make sure your paint is thin and work in coats.


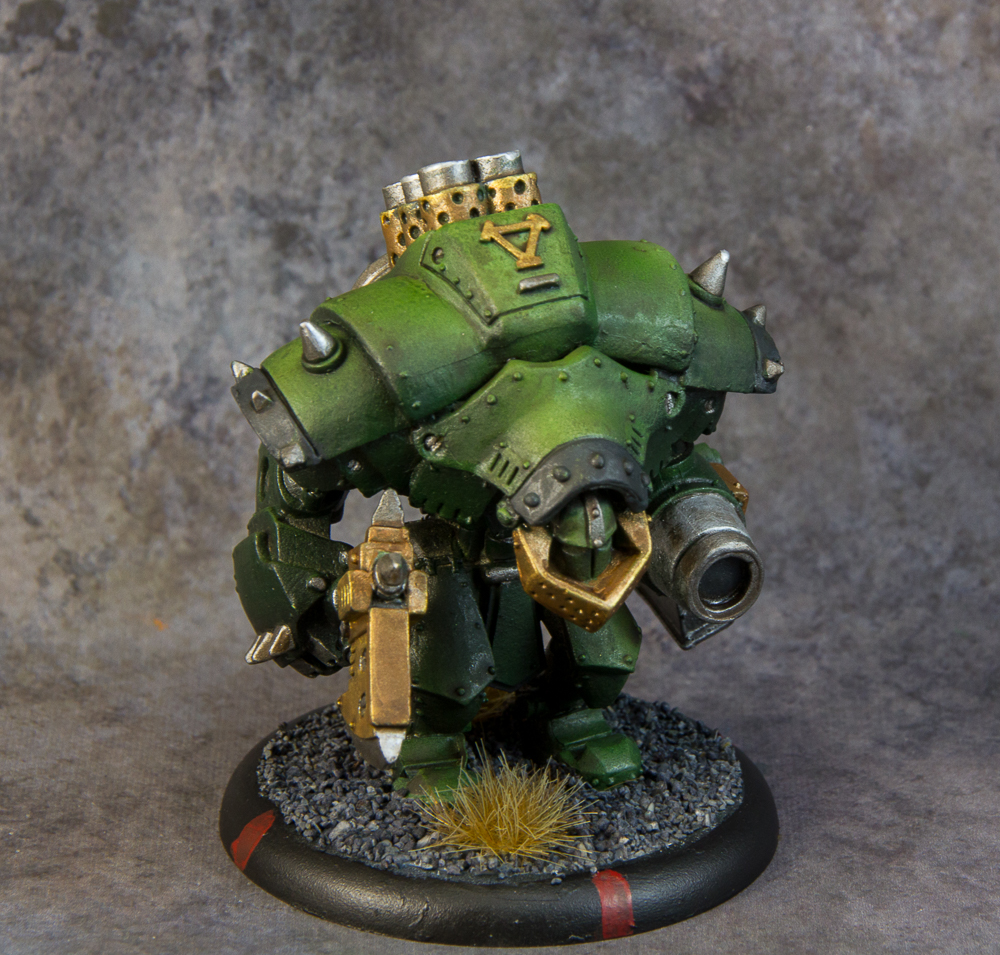
Then for run I did up an older metal Khador Destroyer for fun. I did this one in about 2 hours. Nothing special just wanted a quick project to work on in a color other than red. 


Up next was the Khador Grolar. I tried something different and went with a high contrast between the Red and bright Green. I like it. If you look carefully at the shield on the right arm you will notice some purple and blue inks in an attempt to make the gold look a bit more tarnished. 


Friday, September 9, 2016

The nursing school life.

Well after a 60+ hour week of studying and classes plus a shift on the ambulance at work. I finally had an hour of free time to actually paint!

I wanted to work on a project I haven't had much time for over the last month due to commissions and other life stuff. So I grabbed my Conquest and got to work.

I was able to lay down the under-highlights and the coats of red ink. I got the gloss coat on and had enough time left over to clean out my airbrushes.

Hopefully more to come this weekend.


Friday, August 26, 2016

Odds and Ends.

I just noticed that it had been a over a week since my last blog post. As many of you know it's the time of year that those of us with kids love so much. It's been two weeks of getting children ready for the school year, getting my wife ready to go back to school to change careers and as many of you know I'm starting my Junior year of Nursing School (cuz you know life isn't hectic enough).

I guess what I am saying is that my posting schedule will be slowing down over the next few months. That's not to say that I am going away as I am not. I just wont be producing as much content as I have been. Basically I still love you and need you, I sadly don't have as much time to dedicate to you. So I figure when I am able to post I will really want to make it count......

Ok enough of that noise. So this week I am working on several things at once. I have a commission that is in progress on the Minions Blind Walker from Privateer Press. This thing is a huge gator with a crap-ton of bones and candles on it, and for fun they threw on what looks like the Olympic torch. I mean really how can you say no to painting something like that? I am also working on a throw back project of an old metal Khador Destroyer. This is just a nostalgia piece for me, and it will even be based like we did back in the early 2000's (no I'm not going back to the 90s with the horrible green bases!).

So here are some WIP pics. more to follow.

First some very early WIP of the Blind Walker


And here is some later stage WIP on the Destroyer. 


Thursday, May 19, 2016

Finally a new project!

For those that didn't know, my amazing wife and I had baby number 5 a few weeks ago. It is truly an astonishing thing, and quite frankly she is probably the best mini (see what I did there?) we have ever made.

That being said I was finally able to get back into the painting studio to work on models.

I picked the Privateer Press, Khador Beast 09 Warjack as my return project. It's a really old sculpt and time has not been terribly kind to it, and yet it has a quirky character filled feel about it.

As to painting technique. I started with my typical red ink over highlights mix, and got the black added for the undercoat on the soon to be added silvers. Then went ahead and did the browns to under coat the golds. For this one I am actually using Vallejo - Model Color - Brass. My thinking is that its an older model so why not go a bit toned down on all the shiny bits.


So stay tunes. Lots more to come, and I will be back to the posting at least twice a week in the very near future!

Wednesday, March 16, 2016

Two models in one blog post!


Yes I can't believe it either. I was discharged from the hospital today and had way to much saved up energy when I got home that just needed to be channeled into painting. I was able to finish both the Privateer Press - Extreme Juggernaut and the Privateer Press - Butcher 1 models.

Both are just a blast to paint. The reds were done in my typical red ink through the airbrush technique. You will notice that I used a true black on the juggernaut. I figured I would mix things up a bit there.

I am particularity proud of the fur on pButchers back. Other than that here are some pictures.


Monday, October 26, 2015

And now for something completely different.

As much as I would like to have my Khador fully painted before Warmachine Weekend. I am kinda burnt out on painting that much red.

I've had the Retribution Battle Box sitting around for a while so I figured it's time to get this painted up and on its way. The tradition Retribution paint scheme is this strange white and blue that honestly looks horrible. I figure that they are really just a bunch of angry elves and elves are traditionally green and brown. So naturally I went with green.

I am using the same ink technique I have been showing on the Khador jacks, just this time with a green ink instead. I did find out that the green ink is a bit more opaque than the red, which is a bit strange as they are the same brand, but hey that's how life goes sometimes.

I was able to get to the second highlight followed by the send ink to smooth the blends and now the models are waiting for the first gloss coat to dry so I can keep on keeping on.

With out further ado...... Have some pictures.


Monday, October 19, 2015

Kodiak Display getting ready for Warmachine Weekend.

Hey everybody. I finally had a bit more free time to work on the Kodiak. I really am digging how the display is coming along.

I started with the clay and the trees. Then moved onto getting a "rock" set in for the Kodiak to stand on. Followed by some happy moss and some little bushes to break up the color. I also have a rusted out Menoth Jack thing to give a good contrast to the greens.

Then it was onto the snow. I searched and read and spoke to a few fantastic people in the hobby and found that Secret Weapons Miniatures - Crushed Glass is the best snow effect around. A few words of caution when using this stuff. It is CRUSHED GLASS!!! Wear a friggen N95 mask. You do NOT want this stuff in your lungs (lungs + glass = no bueno). Also wear a pair of rubber gloves and use this stuff on a surface you can dump out. Be safe ok?

So yea basically you use a clear resin like Still Water then dump the glass onto it. It drys and BLAM snow....

Ok I'll stop yapping. Have some pics.


Saturday, September 19, 2015

Butcher and his little Kodiak friend.

Not a big post but lot's of pictures.

I finished up the Butcher tonight and got the Kodiak done as well. So now its time for a beer and some rest.


Wednesday, September 16, 2015

Warmachine Weekend Prep.

Hey everyone. It's been a while since I posted last. School, work, and family have taken up my waking hours over the last few weeks, and let's be honest. While my hobby is wonderful and stress releasing it's still only a hobby and has to take a backseat to real life sometimes.

That being said I finally had so much "need to paint" backed up in me I went downstairs and got some stuff done. I put together eZerkova and her body guard, two units of Greylord Ternion (for her list) and The Butcher 3 unit. Now before you ask, yes that is quite a few pins and all of the pins in Butcher are large. Like 1.5mm thick brass rod large.

Then it was prime time, after a few hours of curing I was able to get the reds onto the Butcher and that is where I stand now.


With only 60 days to go before Warmachine Weekend it's time to put the peddle down and get to work Here is a list of what all I have to get done with before I leave for St Louise. 

Butcher 3 and his dogs
A full unit of Iron Fang Pikeman with Black Dragon UA
Tactical Arcanist Corp
The Full WGDS
2 units of GreyLords
Koldon Lord
Saxin Orik
The War Dog (just needs to be based). 
Full Unit of Greylord Outriders. 
Ayana and Holt
and anything else I am forgetting. 

It's gonna be busy so expect quite a few posts over the next two months!

Thursday, June 11, 2015

Ruin 3.0 - The inking continues....


Hey sports fans. This is just a quick update as I have not had much time to work on painting over the last few days (silly school, work, family getting in the way.....)

I was able to get the second layer of ink onto the model. Just to refresh your memory I used a P3 - Red Ink for this layer. It has a bit more of an Orange tinge to it which balances out the pinkish/purple of the FW - Red Ink of the first layer. I find that when using both it gives a very nice rich red color.

As you can see in the pictures below if we have done the job right using the inks and highlight colors underneath we have achieved a really nice contrast between dark and light. For these pictures there is no light directed at the model. You are seeing the highlights that simulate where the light would hit the model.


After the ink was fully dried I coated the model (where the inks were applied only) with a gloss varnish. This step is critical to seal in the freshness, well to keep the ink in place as it will rub off and interact with the paints that will be applied later if its not sealed properly.

Up next I am going to tape off around the buckler on the left hand, the club in the right, and the ruins around the head. I am basically going to repeat the process of what I did with the reds, but will use greens to give it a glowing look. Something like an OSL but without the light source shining onto the model itself. I hope to get an almost ethereal glow if I do it correctly.