Showing posts with label Oil Wash. Show all posts

Tuesday, December 6, 2016

I'm Back.....................................!

So nursing school is quite literally the time suck from hell, with all the reading, and studying and doing of papers, it really has killed my hobby time.

So with the semester coming up shortly to the end I am starting to see little rays of sunshine through the end of the tunnel (let's hope it's not just a train!).

I decided that I could take a few nights to paint and man was it so nice to slide into the chair, dust off some brushes and get to painting.

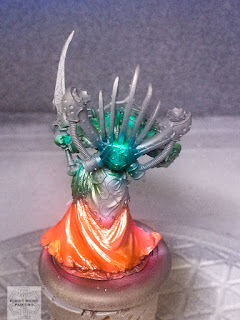
I did up a GW model as I haven't worked on one in ages. I don't know what this thing is but I am sure one of you fine readers will be able to tell me in the comments. As it did not take terribly long to finish I also knocked out a Privateer Press model for the heck of it.

Well OK, Have some pics, I have to go study.


Saturday, September 3, 2016

The Blind Walker.

This was an interesting model. The studio paint scheme is very dark with greens and browns, which lets the candle light really shine through (sorry the puns write themselves!). How ever the client requested a version of the model where the gator was albino. This led to a few challenges the biggest of which was how to create a color scheme that did not all just blend together or be super contrasting. I think I found a good balance with a bit of bright color mixed in.

Also when taking on this model I knew there was a good deal of detail. I really had no clue how many bones, skulls, and candles there where. It's like if GW decided to put all the skulls in one place.

Anyway. I think it came out really well. I also went a bit beyond for the customer and created a custom swamp base.


Let me know what you think.

Sunday, July 31, 2016

Don't leave your War Jack out in the snow.

I'm not the biggest fan of seeing a whole army full of weathered, chipped, and beaten up equipment. Real armies in the real world meticulously maintain their weapons (else they stop working). That being said, we paint and play with toys and whimsy so it's all good to have something all beaten down by time.

Taking that into account I wanted to do something completely different from what I have been working on (manly crisp, clean models that look almost showroom new).

I started out by priming the model in grey, then used a dark brown to base my rust, then added more brown reds and finally orange in certain spots to add variety of color like you would see in the real world.

Once done with that step a HEAVY gloss coat was added. This is needed to protect the rust layer so that it does not get stripped off in later steps.

After the gloss coat was fully cured (about 24 hours). I then coated the model with hair spray. Now a word of caution, do not use your wife's fancy expensive hair spray. First the stuff won't react with the water later, and it's almost guaranteed to start an argument.....Go out and grab a bottle of Aqua Net from the dollar store of your choice.

The hairspray only takes about an hour to set. We then proceed to paint the base color onto the model with an airbrush. this requires very light coats of paint at a lower psi as you want to avoid the water in the paint from activating the hair spray.

After all that works it's then time to ruin a perfectly good paint job. I start by taking a paint brush and loading it with water, then basically "paint the mini" with water in a small section, wait a few seconds for the water to activate the hairspray and then use a tooth brush to chip off the paint. When the desired effect is reached take a dry paper towel and dab the part of the model clean. Then move on to the next piece etc till done.

Once the chipping is finished it's time to protect what is already done. I find another heavy coat of gloss varnish to work really well here and it sets up the next step in the process. The wash.... Personally I like to use an oil was for this effect. not only does it flow into the recess better but you can achieve really nice rust streaks with it as well.

After a few hours of the oil drying I then use weathering powder to further diminish the fresh look of the paint. The not quite dry oil wash helps the pigments adhere to the model.

After that a good matte varnish and then you just finish off the details...

See clear as mud right?

So here is the result of all that text.


Wednesday, July 6, 2016

Man O War Shock Troopers.

These are some of the coolest models I have the pleasure of painting. I had liked the look of them for years but were not really game worthy so I held off on picking up a box. With the new rules changes to Warmachine I decided it was time to give it a go.

First things first. The models were easy to assemble with very little mold line clean up, which is atypical for PVC models. The joints were easy and unlike too many models did not require pinning.

All in all it took about an hour to clean up and assemble the bits.

I did these up in a bit of an alternate scheme, sticking with the red of Khador but forgoing the normal silver on the armor as I felt it would distract from the over all Red/Black look I was going for.

So here are the pictures I find that these might be some of the best models I have done to date.


Tuesday, June 7, 2016

Karchev Completed.

My God, what a fun model to paint. I loved every bit of working on this one.

So without further ado (and a wall of text).......

The Model!


Sunday, June 5, 2016

Kharchev 1.0

I was debating holding my next post for a finished model, but I have been having so much fun working on this one that I just wanted to share.

If you are not familiar with the Privater Press War Machine Line. This is Kharchev. He is both a big stompy robot (aka War Jack) and a War Caster. Basically he is all the cool things that draws one to the game.


First things first. The model is all metal and big with a capital B for something in all metal. Think about the same size as the old GW Daemon Prince big metal model for reference.

With that in mind, I started of course by removing all the flash and mold lines from each piece of the model. Then it was on to pinning, a lot of pinning.....

With that done I moved on to pinning the model to the base and primed with Vallejo Surface Primer - Grey. Once the primer was cured I coated the model with Vallejo Model Color Grey/Black, Then did the first under highlights using stone grey. I then shot the first red inks using FW - Red. Once that was dry I did the second under highlight using a mix of Vallejo Model Color - Flat Flesh and Vallejo Game Color - Red at a ratio of 10:1. Then I shot the second ink using P3 - Red ink.

It was then time to gloss coat to seal in the freshness. Once the gloss coat was cured I started working on the blacks that would both be on the finished model and for an undercoat to the silvers. Again I used Vallejo Model Color - Black/Grey. Once the tedious process of blacking was completed it was on to the brown undercoat for the golds. I used Vallejo Game Color - Beasty Brown. For the next step I needed to decided what gold I wanted on the model. I decided to go with something a bit darker, so I grabbed Vallejo Model Color - Bronze as a base. Then it was onto the silvers. Again I wanted something darker to start with so I chose P3 - Pig Iron.

Once all that was done I worked on his tiny little half face. Which is a great focal point on the model as its a huge contrast to the big shiny robot body. I started with Reaper - Olive Green as the undertone. then glazed Vallejo Model Color - Bright Flesh. Then I did a very light glaze of purple to give the skin tone a bit more depth, and highlighted back up to Bright Flesh. With all that work done, It was time to gloss coat it again.

Then I added the oil washes. For this model I did two. I used a black and Burnt Umber, The black was used on the reds and silvers, and the Burnt Umber on the golds.

So that's were we leave off. The only things left are to add the highlights and shades to the silvers and golds, work on the base, and add the snow effect.


Sunday, February 28, 2016

Extreme Juggernaut 1.0

I decided to take a quick diversion from finishing up the GW models, and work on something I had been given by a friend for Christmas. The extreme juggernaut is a limited edition model from Privateer Press. It's much larger than the normal and weighs something like two pounds (that's just under a kg for you folks across the pond).

So far I have done the reds, blacks, silvers and golds on the model. It's now curing the gloss varnish before I wash and highlight.

Just something quick and fun I wanted to share.

Till next time folks.


Wednesday, February 24, 2016

In the home stretch...

I was able to spend a few hours working on the Rhino and other GW tank last night. Basically I finished up the weathering and then sealed it with a matte varnish (to keep the pigments in place).

The weathering beyond the chipping is pretty easy to do. First thing is to gloss coat after the chipping stage is done. This basically puts a barrier between anything and the hairspray that is still under the paint. Once the gloss coat cured it was time to add the wash. For this model I went with Red Ochre oil paints mixed into a wash by adding mineral spirits. The oil needed over night to dry. Then I used Secret Weapons Miniatures - Rust Red weathering powder to give it a good rusted, dirty look. Then sealed it with matte varnish. The thing to remember about pigments is that they will always darken a bit after being varnished.

So here are the tanks. Now to just finish up the turrets and weapons and this one will be done.


Sunday, February 21, 2016

GW Rhino 3.0

Wow, I can't believe it's been over a week since I have been able to post any work updates. Darn life has been getting in the way of painting time.....

Thank goodness I was able to get a few hours in tonight! In picking up where I left off. I finished up the slivers on the tank treads and all the fiddly bits, and tried a new technique on the smoke stacks. I was looking at pictures of exhaust pipes and thought about how they typically go from silver to gold to blue I wanted to give it shot on the model. I already had the base gold laid down, so I took a new paint in my collection P3 - Blighted Gold and used it as a transition to the top of the stacks. Then I mixed a blue and black acrylic was together for the uppermost part and I really like how it turned out. Then it was time to add a bit more weathering to the model. The first step is the oil wash. I used W&N Red Ocher and applied it liberally to the model. Once this is dry it will be time to go with a good rust colored weathering powder and this one will be in the books.

So here is a bad picture of the progress so far.

Sunday, January 31, 2016

Cryx Update.

So work continues on Gorshade. I am really happy with just about everything on the model so far, except the sword. I think a bit more two brush blending is going to be needed to bring to all the way from a yellow down to a blue. That and the face needs a bit more work as it is blending in with the armor.


Sunday, January 24, 2016

Cryx?

I say, sure why not! Like I promised at the beginning of the month, changes are coming to the blog. We are working on a few reviews that will start rolling out in the next few weeks, and I am ridiculously excited to post them (just have to wait a little longer)!

So while I wait (not so patiently) I figured it was time to enter a few painting competitions. I wanted something completely out side of my comfort zone. I have never been attracted to painting ghoulish models so I am forcing myself to stretch and am working on a Privateer Press - Cryx model. 

This is a Cryx Warcaster called Gorshade. It's kinda creepy, but in a good way. 

The model is being painted up for a particular painting contest so there are a few things that have to be done. It will be part of a diorama and there will be another model or two in the mix. 

So here are the first work in progress pictures to wet your appetite. 


Monday, January 11, 2016

Vladimir the Dark Champion.


What can I say? This model was an absolute blast to paint up. The reds came out well, I really like how the golds are showing and the crushed glass on the base brings in a bit of realism.

So overall a fantastic model.


Next up is going to be something completely different. That's right folks I am putting away the red for a bit (I know right?!?!)

Sunday, January 10, 2016

New Year, New Model to work on!

First off welcome to 2016. So far it's been a really good year here at FMP.

I figure it's a new year, we should probably start putting up some new work.

I have been painting up the Privateer Press, Khador Warcaster "Valdimer The Dark Champion." This model is pretty darn dynamic and I love that it is one that PP has put on an actual sculpted base. That and super sized shoulder pads are always in style.........right?

Not much new technique wise on this one. The large curved shoulder pads lend themselves to the red ink way of painting, I am happy with the highlights and shading so far. I really love how the golds are turning out.

At the point of the pictures I had just gotten a black oil wash laid on and now its drying. I also added a bit of Secret Weapons Miniatures - Crushed Glass to base to really make the snow pop.

Once the oil is dry it will be time to gloss varnish, finish up the highlights on things like hair, golds, and then on to the fringes of the cape. With that much of a flowing cape I'll have to try my hand at a bit of freehand painting. I purposfuly left the cape a dark gray. It should give me some great contrast if I use a bright red or even a grey/white for the freehand work.

So have some pictures and we will be back soon.