Tuesday, May 12, 2015

Thagrosh the Painter 4.0

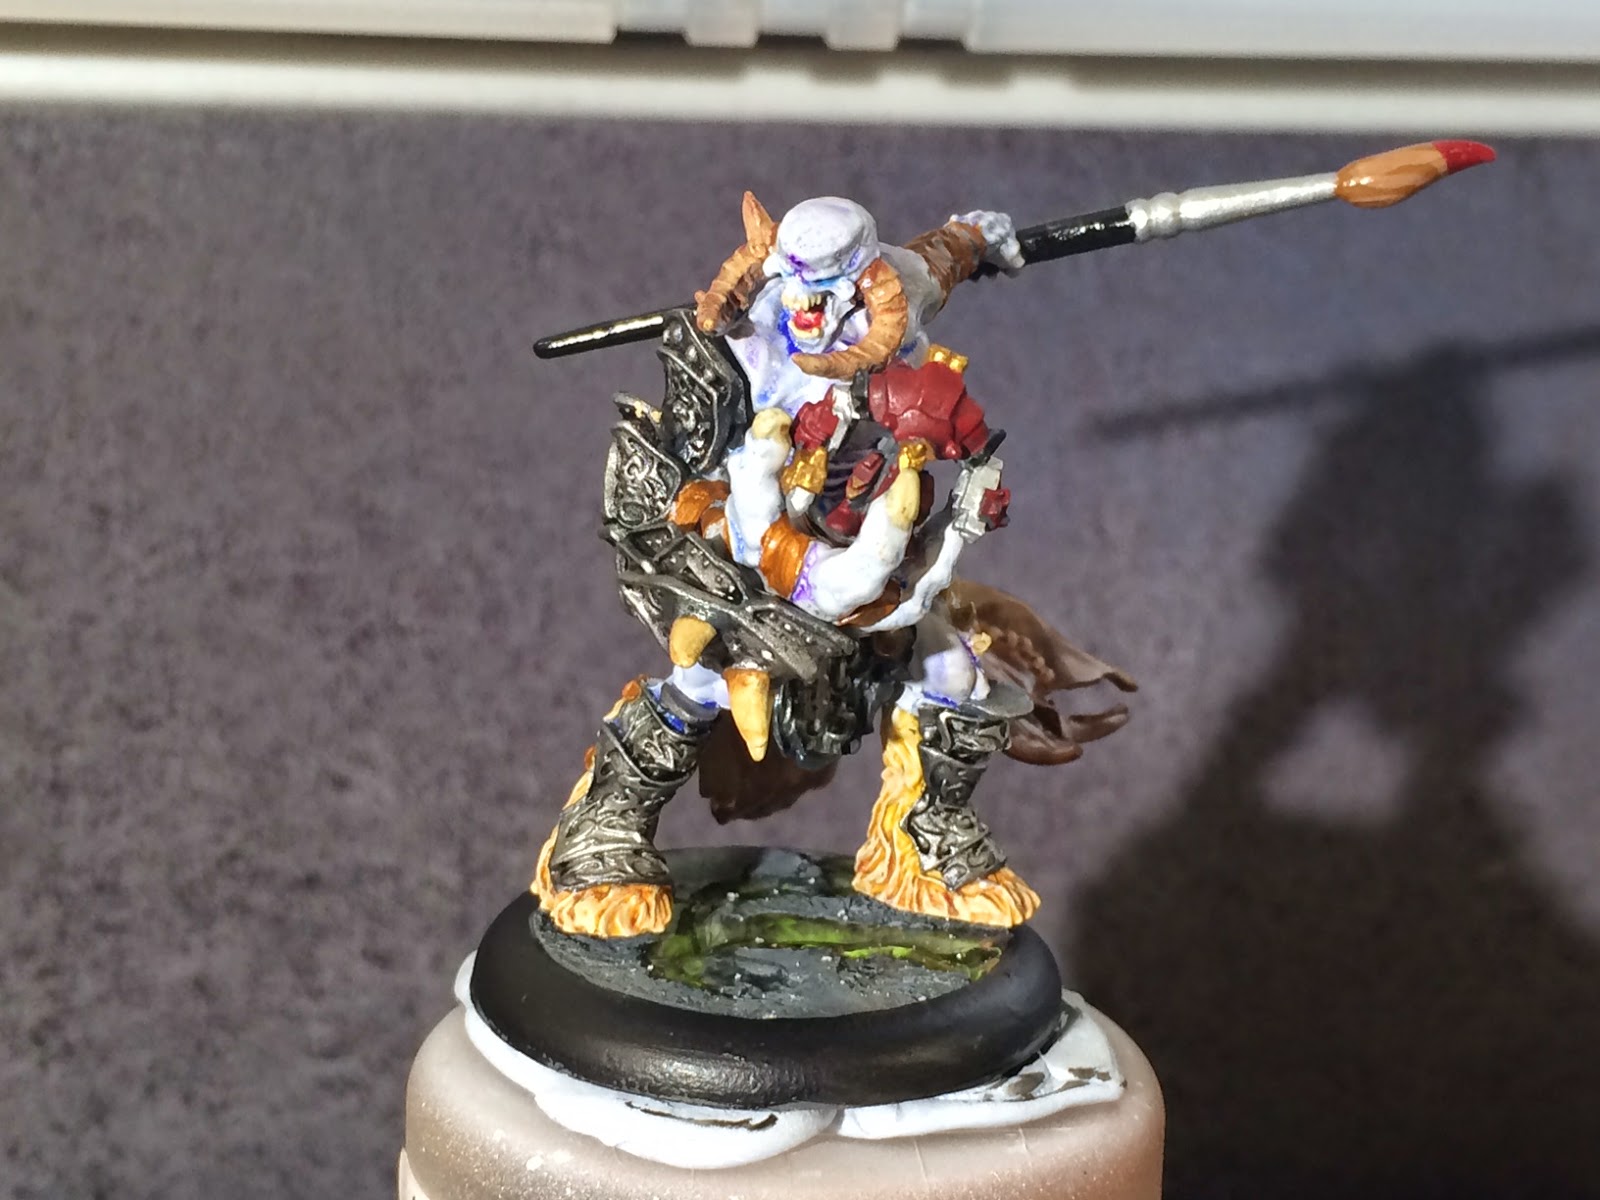
The end is in site!  I was able to spend about 8 hours working on this guy today. So here is a shout out to my amazing wife who made that possible.

I blocked in all the armor with Vallejo Model Color - Grey Black, then added a heavy dry-brush of P3 Pig Iron to give it a nice dark metal look. It really brings out the legs and arm. After that I added some P3 Armor Wash which gives it a slightly blueish tinge which really looks fantastic.

I used P3 Blood Tracker Brown on the leather. If you don't own this color go buy some, Its such an amazing base for leathers.

Then it was time to assemble the model. All of the place holder pins where removed and I carefully glued the pins into the holes I had drilled.

After all of that it was time to gloss coat, once dry I used Windsor & Newton Colbalt Blue Hue for the first wash on the skin bringing it from a stone grey to a really nice blue/grey. Once dried I used Windsor & Newton Purple to add a bit of contrast and depth to the blue.

Now the model is sitting in the airbrush booth with the final gloss coat curing. Once dry and done. i'll clean up a few spots. Add the golds and seal it with a matte coat and this bad boy will be done.

Have some pictures..... they're free.


Sunday, May 10, 2015

Thagrosh the Painter 3.0

Well here is a quick update on this model.

I was able to get blending done on the cape. The more I play with two brush blending the more I love it. I'll write up a blog post on how to do it sometime soon in the future. I just need to figure out how to effectively write it up, and lets be honest there are tons of YouTube videos out there on it. So look it up if you really want to see it done.

After the cape, I cleaned up the over spray on the torso and worked the darker browns onto he spiky-bone things and the horns on his head. I also added the first blue to the eyes.

Then all that went into the spray booth for a gloss coat.


I added the second layer of still water to the base as well. 


Next up it was time to work on the super tiny Mini-Juggernaut that will sit in his hand. This thing just screams Micro-Machine from back in the day. I got the base colors on it and will work on shading soon. 

I also started work on the paintbrush. I'm thinking of making some water slide decals to give the brush a realistic look. 


Well that's it for now. This project is a lot of work but I think it will be fantastic when finished. 

Saturday, May 9, 2015

A quick side stroll over to Terrain.

I have always loved looking at game tables full of fantastic terrain. Whether home made or store bought. It really does pull a table together and helps immerse us in our games. I get tired of seeing green felt cutouts count as "forest" etc.

I had the chance to grab a peasant house that was made of resin from Novus Design Studios.


It came from Miniature Market and had a bit of credit in my PayPal so this wound up costing me about $3 out of pocket. My first mistake was not looking at the scale. I could have sworn it was for 28mm but its 15mm. Not a big deal as it will still be fun to paint and will look good in the display case.

Here is where things are starting to go off the rails.

Bubbles! I understand that resin can have bubbles. I get its a pain if you don't get it just right. But seriously? Bubbles on the sides. On the tops. In the middle of the gate?!? Please if you work for or know anyone at Novus, please ask them to review quality control. I don't mind bubbles on the underside of things, but come on man.


The other issue that I have is it appears that the resin was not fully cured. The resin is "slick", even after letting the piece take a nice long soak in warm soapy water and scrubbing with a brush.

We shall see how it reacts after drying when I try to prime it.

So overall its a really nice design and I can't wait to paint it up. I just hope that the little farm house is salvageable.

Oh and here are the rest of the pics.


Tuesday, May 5, 2015

Someone got a new camera!

Let's talk cameras. For a while now I have been using my iPhone to take the pictures you have been looking at on this blog. I have tried everything I knew how to do to make them the best pictures I could produce given what I had. I used a light box with good lighting. I would crop and adjust white levels as best I could and the results were just ok. Better then some but not anywhere near amazing.

My wife's uncle came to visit and he is a photographer, and in a stroke of generosity I was given one of his older cameras. I now find in my possession a Cannon Rebel T2i (if anyone cares can be found here Canon Rebel T2i).

Here is what the setup looks like now for shooting pictures.


Yes I just took a picture of my camera, How existential is that? 

I now have the equipment to take amazing photos. I just have to figure out how! I am also playing with Adobe Light Box and I might even dabble into Photo Shop.

So stay tuned as I work out the bugs and hopefully deliver much better content (picture-wise anyway). If anyone reading this has any advice/resources to offer I am all ears and would eternally grateful.

Until next time.

Saturday, May 2, 2015

Thagrosh Painter of Everblight 2.0

I was able to work on this today. I started with a 5:1 mix of VMC -Dead White and VGC - Stone Grey. This was laid down as the base skin color. I need something whitish that will hold the blue and then purple inks later in the painting process.

After that dried it was time to add the red glow/gore on the torso. I used FW Red ink and shot it through the airbrush at about 5psi.

Then added on P3 Jack Bone for the spikes and nails.

The cape... ah the cape. I used the Jack Bone for the skulls then P3 Blood Tracker Brown, P3 Beast Hide, and another paint that I didn't right down and can't remember for the browns on the cape. Now to let it dry and then I'll start the blending on the cape to really bring out the highlights.

While everything was drying I started working on the base. The stone is drybrushed in stages from black grey up to stone gray. Then I used VMC - Russian Green as the base color and went up to Neon Green to give it a bit of texture. I poured the Still Water in and now that will cure overnight.

Ah yes past the wall of text and now for the pictures.


Monday, April 27, 2015

Thagrosh the Painter. 1.0

First off, this model is cool, very very cool. This is a convention exclusive from Privateer Press. They took a Warlock, took away his sword and gave him a paintbrush. Then for fun and excitement they put a tiny little Khador Juggernaut in his hand!

Here is what the Privateer Press cover photo looks like.


I was asked to paint this model and really how could I say no.

I got the model prepped and pinned the resin pieces (legs and cape) were pretty rough with mold lines and vent ports.

Then it was time to prime. As big and detailed as this model is it makes more sense to paint the pieces then put it together. You'll notice in the pictures that the torso has a bunch of pins, a few of these are just to keep the holes clear and adds an additional place to hold the model while painting.

Ok enough of me, have some pictures.