THANK YOU!!!
This is not a post about a new model that I am working on or Warmachine Weekend or anything else hobby related.
This post is about you, the reader. Today is a landmark day for Flight Medic Painting. Today this little blog hit 10,000 views! I am beyond humbled by your support and your readership. With so many things grabbing for attention on the internet so many people choose to make my blog a place to visit, even if only for a few minutes.
So thank you! Thank you from the bottom of my heart. You are the reason I keep going. You are ther reason I am always trying to get a model painted and do it better than the last.
Here is to the next 10,000!

A somewhat humble blog about painting and photographing miniatures. I strive to entertain and maybe make your day a bit better!
Showing posts with label Poor Broke disabled Vet.. Show all posts
Showing posts with label Poor Broke disabled Vet.. Show all posts
Monday, November 9, 2015
Saturday, May 9, 2015
A quick side stroll over to Terrain.
I have always loved looking at game tables full of fantastic terrain. Whether home made or store bought. It really does pull a table together and helps immerse us in our games. I get tired of seeing green felt cutouts count as "forest" etc.
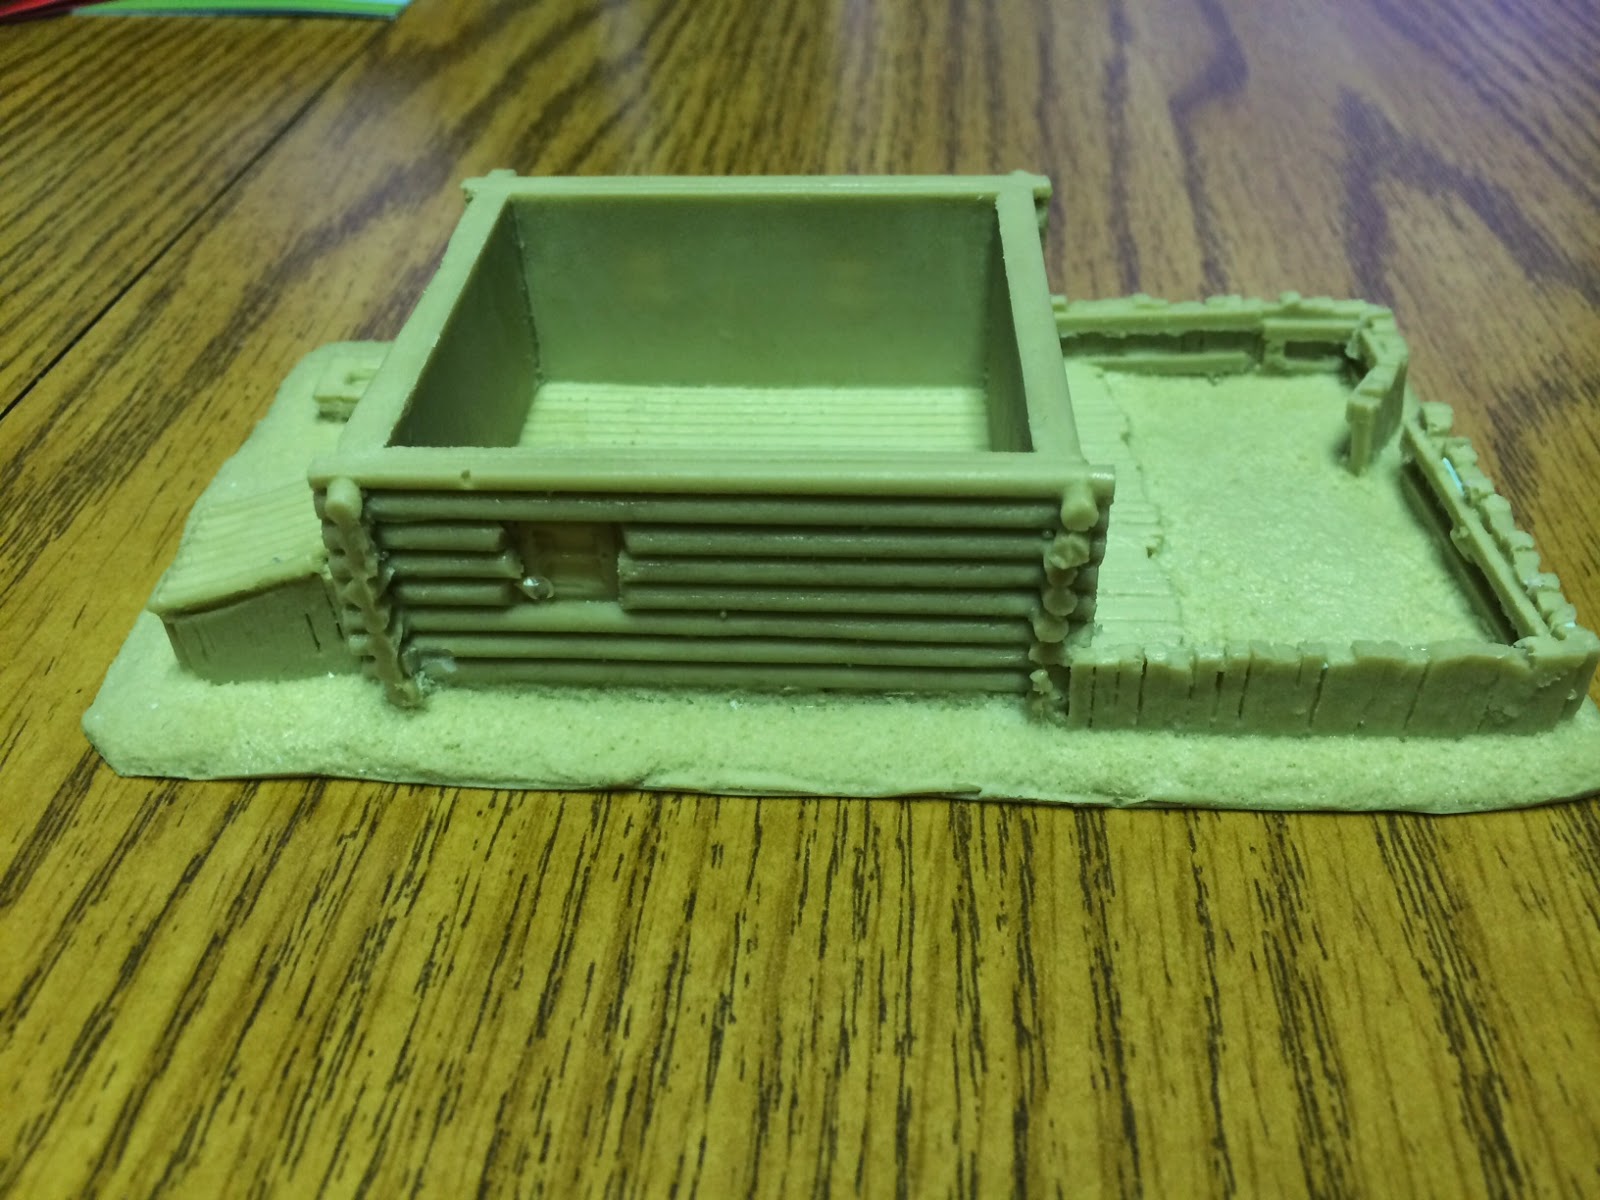
I had the chance to grab a peasant house that was made of resin from Novus Design Studios.

It came from Miniature Market and had a bit of credit in my PayPal so this wound up costing me about $3 out of pocket. My first mistake was not looking at the scale. I could have sworn it was for 28mm but its 15mm. Not a big deal as it will still be fun to paint and will look good in the display case.
Here is where things are starting to go off the rails.
Bubbles! I understand that resin can have bubbles. I get its a pain if you don't get it just right. But seriously? Bubbles on the sides. On the tops. In the middle of the gate?!? Please if you work for or know anyone at Novus, please ask them to review quality control. I don't mind bubbles on the underside of things, but come on man.

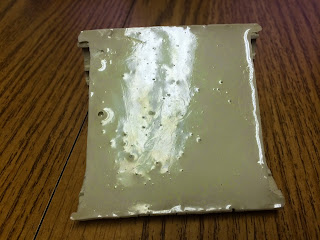


The other issue that I have is it appears that the resin was not fully cured. The resin is "slick", even after letting the piece take a nice long soak in warm soapy water and scrubbing with a brush.
We shall see how it reacts after drying when I try to prime it.
So overall its a really nice design and I can't wait to paint it up. I just hope that the little farm house is salvageable.
Oh and here are the rest of the pics.


I have always loved looking at game tables full of fantastic terrain. Whether home made or store bought. It really does pull a table together and helps immerse us in our games. I get tired of seeing green felt cutouts count as "forest" etc.
I had the chance to grab a peasant house that was made of resin from Novus Design Studios.

It came from Miniature Market and had a bit of credit in my PayPal so this wound up costing me about $3 out of pocket. My first mistake was not looking at the scale. I could have sworn it was for 28mm but its 15mm. Not a big deal as it will still be fun to paint and will look good in the display case.
Here is where things are starting to go off the rails.
Bubbles! I understand that resin can have bubbles. I get its a pain if you don't get it just right. But seriously? Bubbles on the sides. On the tops. In the middle of the gate?!? Please if you work for or know anyone at Novus, please ask them to review quality control. I don't mind bubbles on the underside of things, but come on man.


The other issue that I have is it appears that the resin was not fully cured. The resin is "slick", even after letting the piece take a nice long soak in warm soapy water and scrubbing with a brush.
We shall see how it reacts after drying when I try to prime it.
So overall its a really nice design and I can't wait to paint it up. I just hope that the little farm house is salvageable.
Oh and here are the rest of the pics.


Monday, April 13, 2015
How do you hold your models while painting.
I get asked this question quite a lot. There are a few reasons that you do not want to handle what you are painting directly. The big issues are as follows:
1. Oils from your hands. Yes even you have oily hands. Its just a fact of nature. That oil gets transferred onto the model and can mess with your paint adhering.
2. Snugging the not-quite dry paint. It happens and makes us all want to scream.
3. Its harder to get into the nooks and crannies of some models.
4. Paint rubbing off from handling. How many times have you been painting a model and notice that you once again have to repaint the hair?
So what does one do to get rid of these issues? Well there are several ways. Some folks go out and spend $20 on jewelers tools to hold models. Others drill a pin into the foot/feet of a model and hold it with a clamp. Some Pin and push it into a cork... Lots of ways to do it. All work pretty well.
Personally I like the cork method but a with a bit of a twist. Corks are fantastic, cheap (come free with the wine bottles even), or can be purchased in bags from your local hobby store.
However... for larger models your gonna need a bigger cork. You can spend a pretty penny on them, bind several together etc. Personally I made a hybrid
I used a 50mm round base I had laying around and super glued a cork to its center. It gives me something to hold onto and the base gives it stability
Here is how it looks.
Easy to work with, your hands never get near the model and you don't have to worry about the small cork tipping over and damaging your paint job.
Give it a try and let me know what you think.
Tuesday, April 7, 2015
Exciting news!
I have wanted to create a YouTube channel for a while now but have lacked the funds/equipment to actually do it. Well my amazing wife (she really is the best out there). Decided that it was time and I was able to purchase a camera, tripod, and everything I need to start creating video's to go along with the pictures and walk-threws I have been doing here.
So I plan to shoot and edit my first video this weekend and play with the editing software. I hope to have it up on YouTube next week!
I hope you will like what I produce and am more then open to suggestions for what the first model worked on should be.
Again I want to give a huge shout out to my Patreon with out you none of this would be possible.
Thursday, April 2, 2015
Let's enter a painting contest!
So dakkadakka.com is having a March Painting Contest. The theme is Veteran.
So naturally most people are going to go with something like a GW Space Marine. Or a Dreadnought. I want to do something out of the box and unexpected. And let's face it nobody expects the inquisition....er I mean a PP Mercenary Warjack...
I am going to be going a bit off the reservation with this one. Most of these (and the studio paint scheme) are dark brass/greens. Which are great but don't lend them selves too well to rusting chipping (not a huge leap in color difference).
I'm thinking a lighter Khaki will be the main color for him.
So here is the primed model. I'll be thinking of something for the base.


Too excited about this to want to go to work or college but alas I must.....
So dakkadakka.com is having a March Painting Contest. The theme is Veteran.
So naturally most people are going to go with something like a GW Space Marine. Or a Dreadnought. I want to do something out of the box and unexpected. And let's face it nobody expects the inquisition....er I mean a PP Mercenary Warjack...
I am going to be going a bit off the reservation with this one. Most of these (and the studio paint scheme) are dark brass/greens. Which are great but don't lend them selves too well to rusting chipping (not a huge leap in color difference).
I'm thinking a lighter Khaki will be the main color for him.
So here is the primed model. I'll be thinking of something for the base.
Too excited about this to want to go to work or college but alas I must.....
Tuesday, January 20, 2015
Diorama 3.0
Let's talk models for this bad boy.
So the terrain part is just about done. I still have to make a gnarled old tree which I am going to do with twisted brass rods (that will be it's own post later). It's time to think about the models that are going to be added into the scene. If you notice there are 4 small base holes on one side of the sandbag wall, and on the other side are a medium and large base hole as well. The 4 smaller holes will be for a few Cygnar models I have already painted and don't have a use for. The large base holder is for Khador's Behemoth. I had already owned and painted one but had to sell it some time back for lack of rent fund. So it was with some joy that I got a new one. Then I rememberd having to put the 2lbs of white metal together..... I also picked up pButcher because really if your gonna do something like this you need a big bad model to really drive it home.
Here are the modes in their very early WIP form. Both were primed with Vallejo Grey Surface Primer and allowed to cure over night. Then Behemoth was base coated in a mix of Vallejo Model Color Grey - Black with two drops of Wych Purple (old GW paint).
I also started adding a bit of water effect in some of the holes on the diorama base as well.
Next up will be to make and add the tree in, add some powders to give it a more gritty feel, and possible some static grass here an there for color.
Paint up the models and BLAM.....science...
The next blog post will be back to the GW Vindicator and Predator.
See ya'll soon.
Sunday, January 18, 2015
Diorama 2.0
Sadly I am still waiting on the GW models to dry. I went downstairs today and figured well.... If I can't start working on the tanks I might as well do something productive.
The spakle I used takes about 12 hours to cure so it was good to go. I started by carefully removing the place holder bases I had stuck on with blue tac. I wound up having to use my hobby knife to cut around them so as not to pull up some of the spakle. Once done it was time to get the thing into the airbrush booth and prime.
Now to let the primer cure for a day and then on to painting it up. This should be quick and easy.
Quick Side Project - Diorama
Well last night some painting needed to be done (you know when you get that itch that only working with models can scratch?) So I gathered up my son and we headed down stairs to make some magic. I wanted to start on the Vindicator and Predator but they were not yet fully dried from their Simple Green baths. I really didn't feel like painting my Legion of Everblight, and my son wanted to work on his Protectorate of Menoth by himself.
Then inspiration struck. I have always loved looking at wargaming diorama's. The good ones, the bad ones, the jaw dropping stuff you see from folks like Maz at Winterdyne. I started looking around at my shelves to see what I had that I could use. I decided I wanted to do something fun, on the easier side (it's my first time so why not try and be gentle?) and big.
I remembered that my wife had these 10" basswood rounds in her craft room just taken up space.... I grabbed two of them, some spackle, and it was time to build.
This is going to be a Warmachine Diorama as those are what I have laying around. I had purchased a few models that I wanted to paint but dont have armies for yet so they will go in this thing.
So here is the break down of what I have done and how I did it.
1. Two 10" wood rounds glued together - no picture because come on, use your imagination of a circle people.
2. I grabbed bases for the sizes of models that will be going into the diorama and used blue tack to hold them down on the wood, laying out where I want them to be.

3. As I was doing this my son (8yr old no less) was making sandbags (well cutting them off the sprue) I got these at Hobby Lobby for like $3 fantastic investment I say


5. Then it was time to build the wall up, we went with 3 layers as I figured it gets the idea across without over kill.

6. Now the fun part, laying down some spakle, I don't own a "spakel knife" nor would it be a good idea to use on something like this (too big) but I did have a few plastic knives about so we used what we had. I like using spakle for something like this as its light weight, can be primed and painted and you can make it smooth or give it some texture depending on how you applied it. It was my go to for basing when I took a month and did a FOW army way back in the day. Also a small tub of the stuff is like $4 and is more than enough to fill this entire thing up.

If you notice from the picture, I filled the spakle in high around the bases and up about 1/3 of the way up the first row of sandbags, its going to be the ground (obviously) so it needs to reflect that. The reason to get it slightly above the bases is so that when I put the models on it they look as seamless as possible.
This should dry in about 24 hours and I can start priming and painting it up. Just in time for the Vindicator and Predator to fully dry so I can work on them.
Well last night some painting needed to be done (you know when you get that itch that only working with models can scratch?) So I gathered up my son and we headed down stairs to make some magic. I wanted to start on the Vindicator and Predator but they were not yet fully dried from their Simple Green baths. I really didn't feel like painting my Legion of Everblight, and my son wanted to work on his Protectorate of Menoth by himself.
Then inspiration struck. I have always loved looking at wargaming diorama's. The good ones, the bad ones, the jaw dropping stuff you see from folks like Maz at Winterdyne. I started looking around at my shelves to see what I had that I could use. I decided I wanted to do something fun, on the easier side (it's my first time so why not try and be gentle?) and big.
I remembered that my wife had these 10" basswood rounds in her craft room just taken up space.... I grabbed two of them, some spackle, and it was time to build.
This is going to be a Warmachine Diorama as those are what I have laying around. I had purchased a few models that I wanted to paint but dont have armies for yet so they will go in this thing.
So here is the break down of what I have done and how I did it.
1. Two 10" wood rounds glued together - no picture because come on, use your imagination of a circle people.
2. I grabbed bases for the sizes of models that will be going into the diorama and used blue tack to hold them down on the wood, laying out where I want them to be.
3. As I was doing this my son (8yr old no less) was making sandbags (well cutting them off the sprue) I got these at Hobby Lobby for like $3 fantastic investment I say
4. It was time to figure out where to lay out the sandbag line. I did this dry and then used a pen to loosely mark how I wanted them layed out. Then glued down the base layer using super glue.
6. Now the fun part, laying down some spakle, I don't own a "spakel knife" nor would it be a good idea to use on something like this (too big) but I did have a few plastic knives about so we used what we had. I like using spakle for something like this as its light weight, can be primed and painted and you can make it smooth or give it some texture depending on how you applied it. It was my go to for basing when I took a month and did a FOW army way back in the day. Also a small tub of the stuff is like $4 and is more than enough to fill this entire thing up.
If you notice from the picture, I filled the spakle in high around the bases and up about 1/3 of the way up the first row of sandbags, its going to be the ground (obviously) so it needs to reflect that. The reason to get it slightly above the bases is so that when I put the models on it they look as seamless as possible.
This should dry in about 24 hours and I can start priming and painting it up. Just in time for the Vindicator and Predator to fully dry so I can work on them.
Friday, January 16, 2015
GW Vindicator and Predator. 1.0
My friend sent me some models to redo for him. I got these bad boys in the mail today. Just a few broken off pieces here and there so nothing major needs to be done to fix em.
We are going to be doing a Khorn theme for these. The came already in the process of being painted. So right now they are in about a gallon of Simple Green. We discussed how they should look and the over arching desire is this, Evil! Expect to see some fun and new things as I go on this one. I hope it turns out like I see it in my head.
So here are the before shots..... You will notice the whites are a bit blotchy and the golds appear to be painted strait over black. One should never paint gold over black. Always go for a brown first. This will allow for better coverage and a more natural gold look. You can alter the light and darkness (richness if you will) of the gold by the brown you use. I tend to stick with Vallejo Beasty Brown for most golds but you can go as dark as Mahogany or as bright as a Khaki if you want.
See ya'll in a few days after these have been scrubbed clean and dried.
Monday, January 12, 2015
Menoth 3.0 - Finished off the Choir.
Finally got home from work and finished these guys up. I am happy with how they turned out. I was shooting for a good table top standard and I think I have achieved that. Keep in mind these are for my 8 year old to play with so I didn't go all out and spend 30 hours on a 6 man unit.
Also this was the first time I got to try out a light box. Still messing with the lighting to figure out what is going to work best. Now to convince the wife that I need photoshop and classes on how to actually use photoshop....
Next up I think I am gonna paint some GW stuff, Its been a while and a really good friend is sending me some tank type stuff to do.
Saturday, January 10, 2015
Menoth Choir 2.0 (and some legion to boot).
Well it's been a bit and I realized I hadn't been down to paint in over a week.
So I put the baby down for a nap, let the older kids get on the MineCraft (aka Kid Crack) and headed off to the painting cave.
In our last installment of painting the Choir I had just used an oil wash on the leader. I had since finished the base coats on the grunts and used Tamiya Gloss Coat on them to seal in the freshness (well that and seal them off so I could apply the wash).
So today I washed them using my last pot of Devlin Mud. For those new to the game Devlin Mud is probably the best GW product to come down the pipe. It really is talent in bottle. It's just shy of an actual oil wash but I was a bit lazy today and didn't feel like mixing a wash so I didn't. All that's left on the grunts is to let them dry, hit em with a dull coat of varnish, add the highlights and squiggle some lines on their parchment looking things. The Choir's Leader is just about done. He needs a few more highlights on the golds and some Gloss Coat on gem stones and we can call it a day.
Have some pics (they're free ya know).
As a bonus I put together a Legion Angelious. This is somewhat of a side project for further down the road. I felt like putting together a model or two and the box was just sitting there all innocent like, just begging me to open it.
Quick rant. This model has eight pieces. 8! It should not have taken me a goram hour and a half to put it together. Its white metal and that's awesome, but man the flash and the need to pin (big and small) because of its weight was just nuts. Add in all the spiky bits.... and erg, Why? Why did I get two of them?
Tuesday, December 16, 2014
My son's first real game!
Well now that we have this gaming table in the basement it was time to play on it. My son is 8, he is awesome and really likes Warmachine. He like Protectorate of Menoth so we got him a 50 point list together. He has played a bunch of caster kill games on our dining room table but never a real game before.
We played scenario and it was fantastic. He lost, but he did really well. I can't wait to play him again.
Here he is deploying his models.

Hmmm where should I put these guys?

Counting em out to make sure his stuff is all there.

Awe man, is that a Galleon over there? Good Thing he has the Avatar of Menoth.

Look at that pretty table!

Well now that we have this gaming table in the basement it was time to play on it. My son is 8, he is awesome and really likes Warmachine. He like Protectorate of Menoth so we got him a 50 point list together. He has played a bunch of caster kill games on our dining room table but never a real game before.
We played scenario and it was fantastic. He lost, but he did really well. I can't wait to play him again.
Here he is deploying his models.
Counting em out to make sure his stuff is all there.
Awe man, is that a Galleon over there? Good Thing he has the Avatar of Menoth.
Subscribe to:
Posts (Atom)