Monday, March 2, 2015

Juggernaut....

This one is just about done. Just need to add the black highlights and put him on a real base. This is the second model I have used inks for color on and man the technique is just amazing. I'm gonna order them in a few more colors and see if I get similar results out of blue, greens, yellows.... hmm ideas, ideas..

Well I'm running late for work so have a photo dump. More this weekend when I actually have a minute to breath.


Thursday, February 26, 2015

A few things..... This one is gonna be a bit long and rambling and has a few subjects.

Sorry in advance my ADHD is kicking in a bit. Well I don't actually have that but I didn't feel like working on the Butcher/Behemoth diorama and my Karchev model came in the mail the other day and ya'll know how Shiny Object syndrome works....

Anyway. I ordered the Karchev model with no intention of ever actually fielding it on the table, but its such an incredible model that I really want to paint it up. I figured hey why not take the lessons I've learned about building a diorama and see if I can do even better. Off to Hobby Lobby I went to find some things... I grabbed a 10" diameter balsa wood plinth for $1.99 and some wood putty. I already had some plastic brick wall stuff and other things in my bits box. So I walked out of Hobby Lobby for under $10 equipped with what I needed.

First thing I did was put together the model. This thing is all metal and weighs about 2lbs! Its solid and big and lets face it, kinda awesome. The 2 Storm Guard will be added in to the diorama as well so I included them in the picture for scale.


Next up it was time to lay out what I want the diorama to look like. Out came the pen and the bad drawing skills. 


Not sure why this image is staying sideways....

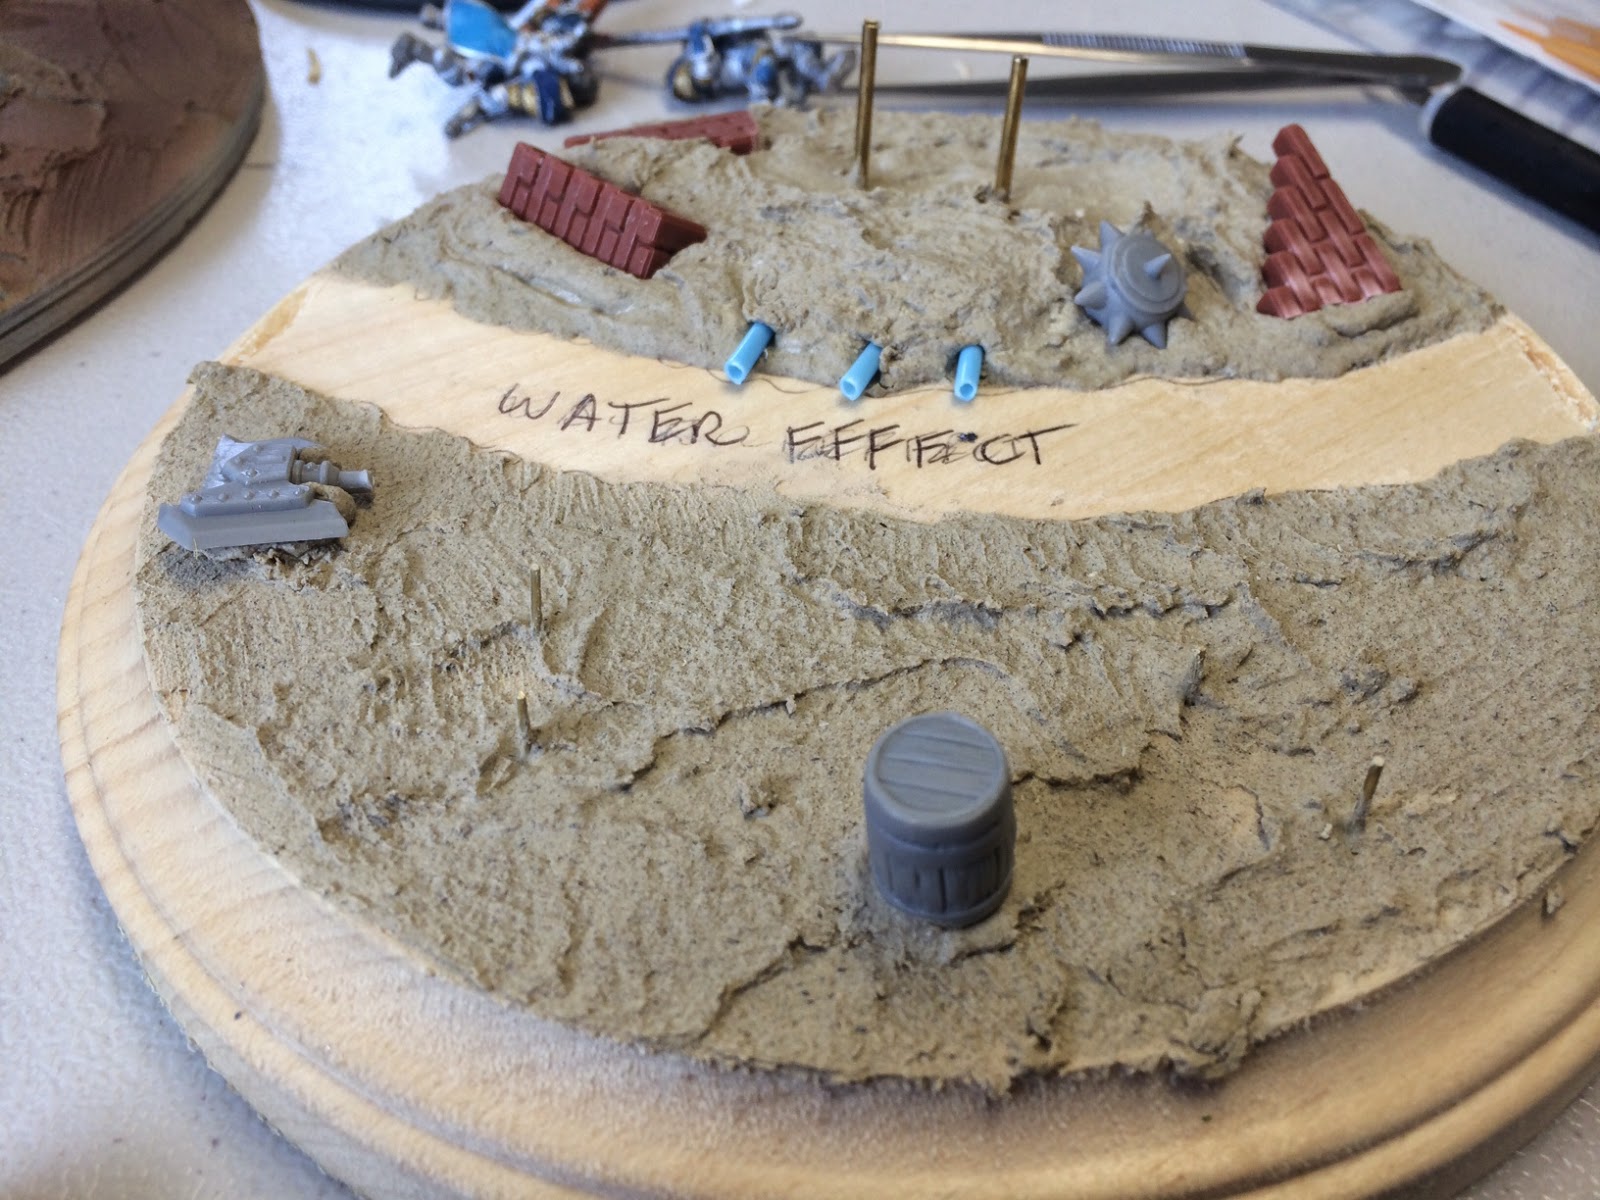
Then it was time to add the first layer of wood putty


You can see that I drilled into the wood and placed brass rods where the modes will be. This will let me slide them on to the pins when all is said and done giving it what I hope will be a seamless look.

Next it I smoothed out the lower side and added in some eye candy.


I used a few Warjack weapons, a barrel ect to add a bit and break up the open ground.

My favorite addition is the pipes coming out into what will be the water down the road. I made these by cutting two Q-tips (ear cleaning things for you non-Americans).

You can also see that the very end of the water part I cut into the wood to give it a bit of a channel. I am hoping that it will keep the water in place without having to add a rim around the entire thing.

Now to let the wood putty dry. Then off to priming and base coating, followed by painting and flocking....


But wait there is more.... Now that I had a few models ready I figured it was time to prime.

I was able to prime Karchev, the Juggernaut from the last post, and a Menoth Redeamer that I picked up for my son.


Last but by no stretch of the imagination least. My Table Scapes tiles finally came. It was a long 2 year wait on the kickstarter but they are amazing. 

My guess is I'll get to them in the next 6 months. 


Saturday, February 21, 2015

I found something....

I had found myself in a part of town that I normally don't go to and remembered that there is a small Game store off the main strip. I had a about an hour before my next class so I decided to stop in and see what they were all about. It was your typical Magic, GW, all the other games type store. A bit small but looked like it might be a good hang out. I was browsing the walls and happened upon an old (like more than 5 years) Metal PP Juggernaut. This is like the model that made Warmachine for me back in the day. It's a big hunk of white metal, it's solid and just downright cool. They offered me an amazing deal on it (thanks Patreons!) and I picked it up.

 Apparently my memory was a bit fuzzy cuz I forgot about the old "Khador Gap" the old metal models didn't quite fit together right. So as I assembled it I noticed a few spots that need to be filled and filed. I'm glad PP has come a long long way on these. But for nostalgia purposes this is gonna be fun.

So have some pics! Its assembled and I am letting the glue cure before a soapy water bath and then some priming.


So very many gaps to fill! How cool and towering is this model though?

Tuesday, February 10, 2015

Behemoth Finished!

I was finally able to sit down over the weekend and finish up this model. I really love how it came out. Using inks to create color is just an amazing technique that I plan to use a lot of in the future. The depth of color is just unreal, and it really knocks down the airbrushed look. I wish I were able to take a picture that truly captures just how rich and deep the color is.

The base is very basic and bland, and there is a reason for it. It is made to fit into the diorama that I am working on. So please judge the model without the base.

I cant wait to get another model and try to make it even better using inks.

Also I want to give a HUGE shout out to my Patreon donations Thank you for helping make this possible. I would ask if anyone else is willing to pitch in. I have ideas of bigger and better things but can only do it with your help. If you can spare a dime please do here My Patreon every dime of this goes to models, paints, brushes etc. Nothing in my pocket it all gets put back into the blog and eventually a YouTube channel when I can afford the equipment to do it.

So have some pictures and scroll all the way to the end for a spoiler of whats up next.


Here he is on the diorama base 


And the spoiler I promised.


Friday, January 30, 2015

Diorama 7.75

To answer your first question, Yes my numbering system is completely arbitrary.

OK, that out of the way. I was actually able to sit down for a few hours and paint! Behemoth's matte varnish had dried over night and so the hair brushing could now begin.

I used Vallejo Game Color - Black, and yes you are correct I have repeatedly said to not use strait black on your models. Always go a shade lighter. You are correct, however the black in this case is needed and will be highlighted up to the point of not really even noticing it was strait black to start with.

Then it was on to the metallic colors. The silver is Vallejo Model Air Chrome. I wanted the silver to be really bright and shiny so when it is knocked down with a wash or two it still has a bit of a gleam to it.

The brass..... Oh the brass. I started out with Vallejo Game Air Brassy Brass and I am honestly disappointed in it. The coverage is still fantastic but it is way to brown. I mixed it with about 2:1 Vallejo Model Color - Brass and it gave me a good mid-tone brass. Then it was time for a quick wash. I used Vallejo Game Color - Sepia Wash as a first wash to bring down the silver and brass.

Now to let it dry. and then it will be time to work on details like highlighting the black, adding battle damage and washing it again.

So here have some pictures.


Wednesday, January 28, 2015

Diorama - 7.5

We last left off at the over highlighting and it already was starting to look rich with a good depth of color.

I went to the Hobby Lobby yesterday and got some artists inks. I grabbed the FW stuff that is made for ink pens an airbrushing. It comes in a decent sized glass bottle with a glass dropper built into the cap. How cool and old timey is that?

When I pulled some out to put into the airbrush I noticed some stark differences right away to the P3 ink. This stuff is much thinner and more vibrant. I tested shooting it through the airbrush at 10psi and had to turn it down to about 5psi to get it to shoot without spidering.

I laid a very, very light coat down over the flesh tones and man it just looks amazing. The model is drying right now. I hope to get to at least varnish it again tonight so that I can finish this up on Friday and move on to the next model.

Take a look at how its turning out so far.


Diorama 7.0 - The Highlights.... Oh the Highlights.

I had a few minutes after class (so read about 10pm last night) to work on this model a bit more. I was able to add the second highlight (well first over color). I used Vallejo Model Color - Light Skin Tone mixed at 1:2 with water, and very slowly applied the highlight to the raised areas. I can honestly say I am just astounded at how well this technique works. The depth of color is just insane (I think I said that after the last coat too but man it's true).

To give you an idea, there is no direct light on this model. the "shine" is all paint.

Up next will be a very light coat of red ink to smooth out the highlights and then its on to the blacks, golds, silvers etc.....