Showing posts with label Cygnar. Show all posts

Friday, July 21, 2017

Nemo part 3.

Well things are moving along with this bust. I'm still happily surprised with how smooth and almost easy it is to paint this thing. The lines are just nice and crisp, the edges are defined well. I kinda wish everything was as nice to paint as this one.

With that all out of the way, lets get down to some painting.

I started by grabbing the silly putty to mask off the face. I used a sculpting tool to push the putty away from the face and into the crevasses so that I had a clear shot to the face with the airbrush. It's almost funny how much it looks like a shroud.


After that I used Reaper Masters Series Olive Drab as the base color for the skin tone. Then moved on to a glaze of Reaper Masters Series Tanned Flesh. After that dried I hit it with the Tanned Flesh Highlight (again watered down to a glaze). 


Up next will be to darken the shaded parts of the face and bring up the highlights a bit more, but that's all for the next installment. 


Thursday, July 6, 2017

Nemo update 1.

Well this guy is coming along nicely. I decided that the end goal is going to look as though Nemo has seen some better days. With that in mind I started out with a rust under coat. I'll be using the hair spray technique on this one. I feel that it gives a real feel with depth to the rust and pitting in the armor.


Here you can see that I started with a base brown and worked up different spots to almost an orange. It's important to vary the colors of your browns as it is both visually stimulating and mimics what rust actually looks like.

Next up was a heavy layer of gloss varnish. This is important. It needs to be heavy to protect the rust layer for whats to come down the road.

After the varnish had time to cure (about 8 hours) It was time to coat the model in hair spray. As I've said time and again, you must use the cheap stuff. Aqua Net all the way. Don't go and steal your significant others (or even your own) fancy smells good stuff. We need the cheap stuff that almost instantly activates when wet.

I let the hairspray dry overnight. While it does not require anywhere near that long to dry I was tires and hit the sack.

Next up it was time to base coat. The standard paint job for this sculpt and pretty much all Cygnar is blue..... I am not going blue. It's just boring to me. I wanted an almost yellowish green look for this one and started with a nice base coat. One thing to keep in mind is that the hairspray will activate with water. So when working over it you must keep moving your airbrush and build up the layers slowly. This takes time but it is worth it. With the base coat laid down It was time to apply the highlights. I basically took my base coat and added white till I was happy that there would be enough contrast and even help bring out a bit of shadow.


And not it's time to let everything dry. Next up will be paint chipping and weathering around the rust. 


Monday, July 3, 2017

General Adept Sebastian Nemo!

I think it's time to bring out this bad boy. This was the Gen Con bust that Privateer Press released last year. He's been sitting on the shelf a while. I've never done a bust from PP before, but having worked with plenty of their regular models I was a bit nervous to crack the box open. PP likes to use resin and PVC plastic. Anyone who has had the displeasure of working with PVC knows just how frustrating and time consuming it is to get mold lines and imperfections out of the material. You can't really use a hobby knife as the stuff forms long strands and gets really weak and likes to peal like an apple. Using a metal file is a no go as the stuff likes to shred. I have found that the Tamia (sic?) file sticks work well on PVC but take a while to get it filed down right.

So after all of that I opened the box.


I was quite surprised at just how clean the model was right out of the gate. 


You can see that there is very little to clean up on the front side. Just a bit of flash right under the lower belly. 


On the back between the shoulders was a vent that needed to be cut off and sanded down. Other than that there was a very slight mold line on the top of the coil sticking out above his head. 

The shoulder things are another matter. These had really bad mold lines on the under side. I can forgive this as its going to sit flush against the model (and do not really need to be added in any case). 


All in all this looks like it is going to be a really fun project to work on over the next few weeks.

As a side note. I'll be testing out the new SOTAR 2020 on this one. So bonus right? 

Thursday, April 16, 2015

Cygnar Junior Warcaster 1.0 -

So I happened upon this model and I really liked the simple pose. It looked like a fun simple few hour project and that's just what I was in the mood for.

I used the airbrushed ink technique on him for the blues. The more I use it the more I love how it looks. Inks and highlights under them just make shading look fantastic and take about a quarter of the time that traditional methods like two brush blending do.

I used Vallejo Red Gold on the armors trim and Vallejo Old Gold (alcohol based) for the brasses. The pictures below are just after I did all that. Now its time to let the Gloss Coat dry so I can add the oil washes and bring everything down a notch, I also need to finish the face and Blam......science.


Better pics to come in the next day or two, once the model is done, based and put into the light box. 


On a side note. Video shooting is both fun and hard. Learning to paint to the camera has been the biggest challenge. So please be patient as I work the bugs out and bring you a quality product. 

Thanks everyone for reading my ramblings. 


Monday, April 13, 2015

How do you hold your models while painting.

I get asked this question quite a lot. There are a few reasons that you do not want to handle what you are painting directly. The big issues are as follows:

1. Oils from your hands. Yes even you have oily hands. Its just a fact of nature. That oil gets transferred onto the model and can mess with your paint adhering.

2. Snugging the not-quite dry paint. It happens and makes us all want to scream.

3. Its harder to get into the nooks and crannies of some models.

4. Paint rubbing off from handling. How many times have you been painting a model and notice that you once again have to repaint the hair?

So what does one do to get rid of these issues? Well there are several ways. Some folks go out and spend $20 on jewelers tools to hold models. Others drill a pin into the foot/feet of a model and hold it with a clamp. Some Pin and push it into a cork... Lots of ways to do it. All work pretty well.

Personally I like the cork method but a with a bit of a twist. Corks are fantastic, cheap (come free with the wine bottles even), or can be purchased in bags from your local hobby store.

However... for larger models your gonna need a bigger cork. You can spend a pretty penny on them, bind several together etc. Personally I made a hybrid

I used a 50mm round base I had laying around and super glued a cork to its center. It gives me something to hold onto and the base gives it stability

Here is how it looks.


Easy to work with, your hands never get near the model and you don't have to worry about the small cork tipping over and damaging your paint job. 

Give it a try and let me know what you think. 

Thursday, February 26, 2015

A few things..... This one is gonna be a bit long and rambling and has a few subjects.

Sorry in advance my ADHD is kicking in a bit. Well I don't actually have that but I didn't feel like working on the Butcher/Behemoth diorama and my Karchev model came in the mail the other day and ya'll know how Shiny Object syndrome works....

Anyway. I ordered the Karchev model with no intention of ever actually fielding it on the table, but its such an incredible model that I really want to paint it up. I figured hey why not take the lessons I've learned about building a diorama and see if I can do even better. Off to Hobby Lobby I went to find some things... I grabbed a 10" diameter balsa wood plinth for $1.99 and some wood putty. I already had some plastic brick wall stuff and other things in my bits box. So I walked out of Hobby Lobby for under $10 equipped with what I needed.

First thing I did was put together the model. This thing is all metal and weighs about 2lbs! Its solid and big and lets face it, kinda awesome. The 2 Storm Guard will be added in to the diorama as well so I included them in the picture for scale.


Next up it was time to lay out what I want the diorama to look like. Out came the pen and the bad drawing skills. 


Not sure why this image is staying sideways....

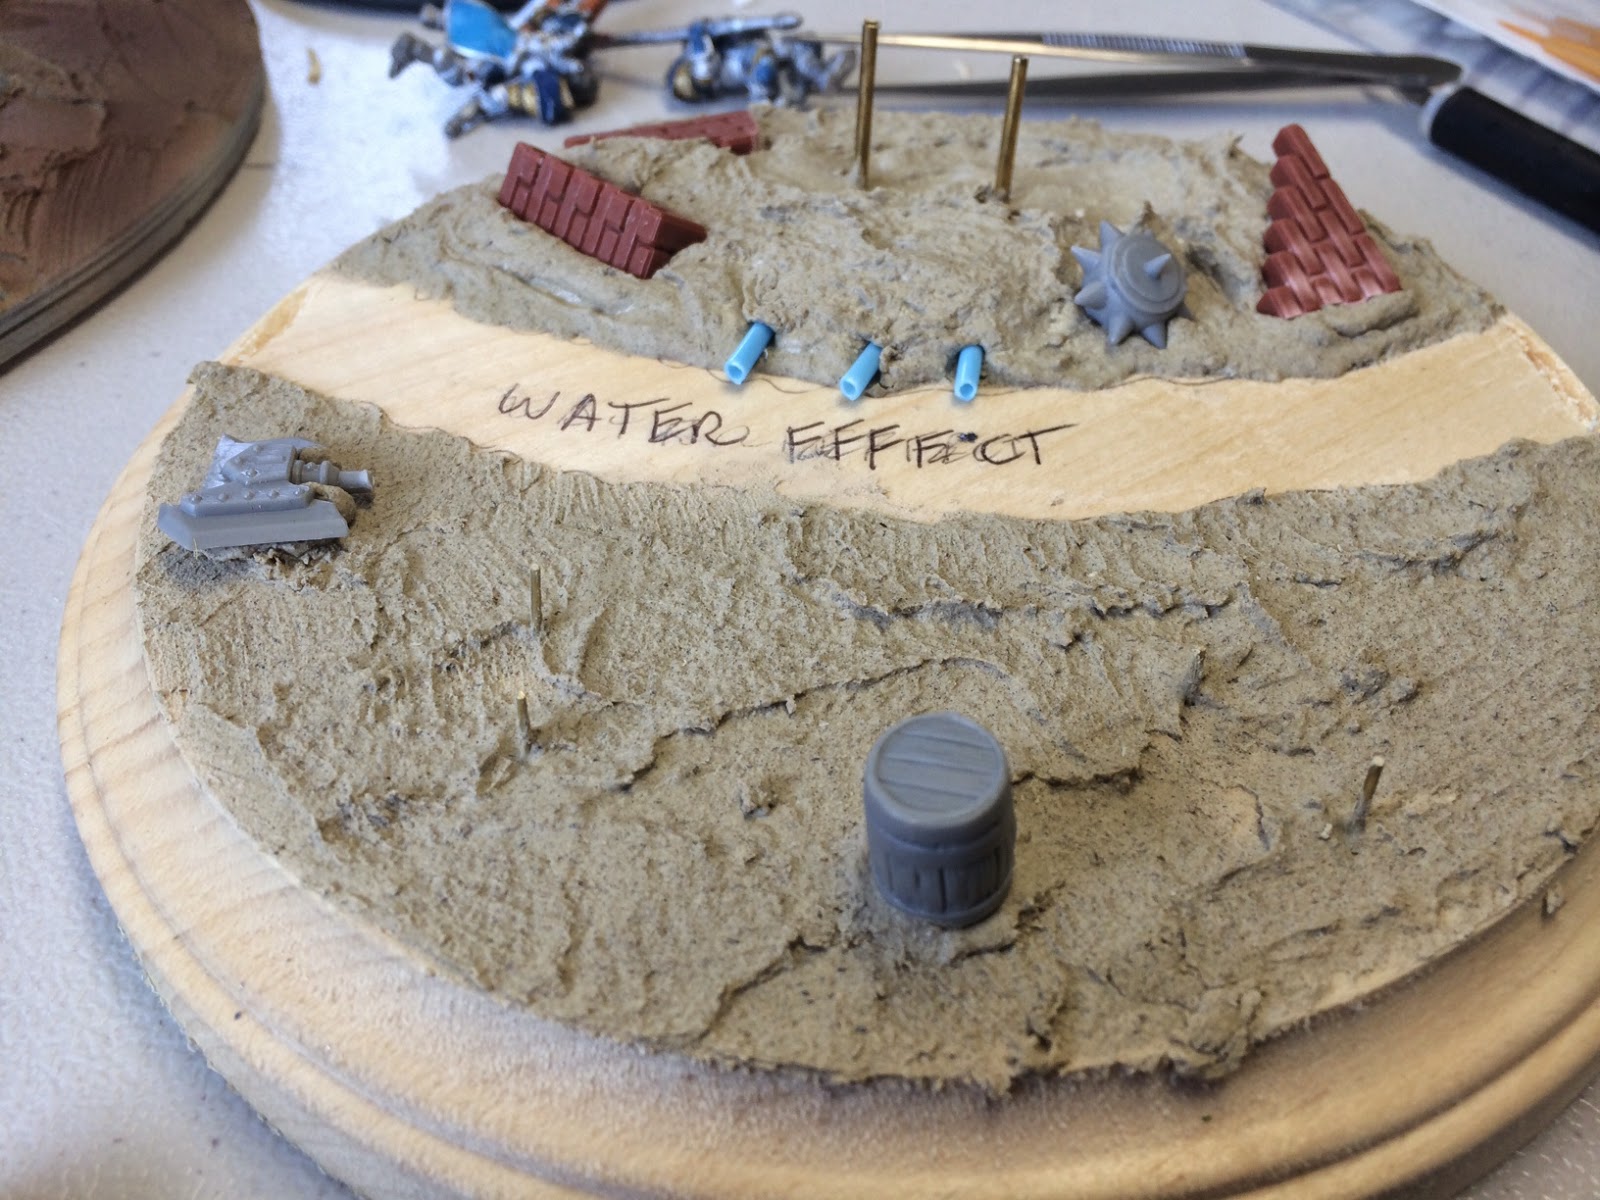
Then it was time to add the first layer of wood putty


You can see that I drilled into the wood and placed brass rods where the modes will be. This will let me slide them on to the pins when all is said and done giving it what I hope will be a seamless look.

Next it I smoothed out the lower side and added in some eye candy.


I used a few Warjack weapons, a barrel ect to add a bit and break up the open ground.

My favorite addition is the pipes coming out into what will be the water down the road. I made these by cutting two Q-tips (ear cleaning things for you non-Americans).

You can also see that the very end of the water part I cut into the wood to give it a bit of a channel. I am hoping that it will keep the water in place without having to add a rim around the entire thing.

Now to let the wood putty dry. Then off to priming and base coating, followed by painting and flocking....


But wait there is more.... Now that I had a few models ready I figured it was time to prime.

I was able to prime Karchev, the Juggernaut from the last post, and a Menoth Redeamer that I picked up for my son.


Last but by no stretch of the imagination least. My Table Scapes tiles finally came. It was a long 2 year wait on the kickstarter but they are amazing. 

My guess is I'll get to them in the next 6 months. 


Tuesday, January 20, 2015

Diorama 3.0

Let's talk models for this bad boy.

So the terrain part is just about done. I still have to make a gnarled old tree which I am going to do with twisted brass rods (that will be it's own post later). It's time to think about the models that are going to be added into the scene. If you notice there are 4 small base holes on one side of the sandbag wall, and on the other side are a medium and large base hole as well. The 4 smaller holes will be for a few Cygnar models I have already painted and don't have a use for. The large base holder is for Khador's Behemoth. I had already owned and painted one but had to sell it some time back for lack of rent fund. So it was with some joy that I got a new one. Then I rememberd having to put the 2lbs of white metal together..... I also picked up pButcher because really if your gonna do something like this you need a big bad model to really drive it home.

Here are the modes in their very early WIP form. Both were primed with Vallejo Grey Surface Primer and allowed to cure over night. Then Behemoth was base coated in a mix of Vallejo Model Color Grey - Black with two drops of Wych Purple (old GW paint).


I also started adding a bit of water effect in some of the holes on the diorama base as well. 


Next up will be to make and add the tree in, add some powders to give it a more gritty feel, and possible some static grass here an there for color. 

Paint up the models and BLAM.....science...

The next blog post will be back to the GW Vindicator and Predator. 

See ya'll soon. 


Thursday, January 1, 2015

Display Case!

My amazing wife and I took the kids to the Ikea today. I have wanted a display case for my models for a very long time. We did the Swedish  meatballs and all that jazz, dropped the two middle kids off in the play area and went a walking through the maze that is the Ikea store.

Low and behold there it was all on sale and glorious. The display case of my hobby dreams. It was all glass and for only $69.99 (plus $9.99 for the lighting). My Wonder Woman of a wife actually said yes when I asked if I could have it.

So after two hours a few choice curse words and lots of Windex, here it is. Bask in it's glory. It's ok if you want to be a bit jealous.

Now I just need to hurry and finish a bunch more models to add to it.


 Now that right there is some motivation to get painting!

Saturday, April 5, 2014

Bases Update - now with 100% more blood.

Sorry for the long time between updates. I have a wonderful wife and 4 lovely kids that demand so much friggen time......

So yea I was finishing up a commission for a friend tonight who wanted his PP Cygnar Black 13th and they were done and I was waiting for the varnish to dry so I grabbed out the bases and added the red for the blood.

Blood is an easy thing to get wrong. Too much and it looks stupid. To little and it hardly shows. Now add in the mix that I will be putting a clear resin on the bases to look like wet blood and stuff starts to get a bit complicated. Ok not really complicated just more steps is all.

I used P3 red ink and watered it down at 2:1 ink to water. Then I used my old beat up keep around for stuff like this brush and basically just dabbed it on the base not really worrying if some got onto the bones and skulls.

After that I took a bit of P3 green ink and hit some of the brighter spots of red to tone it down some, That and the green under the resin will give it a sort of sickly look when its all said and done.

Here have some pictures.


Wednesday, November 13, 2013

And.... We are back for another exciting episode of.......No I haven't finished the Galleon yet. Yes I am aware its starting to sound like a joke/mythical creature.
In my defense I started a new job this week and for some reason they expect me to be there all the time.

So what have I gotten done you ask? Well I managed to finish another commission piece for a friend (payed for models get done faster).

This is the Cygnar Thunderhead. It reminds me of a DJ for some reason.

The Thunderhead was a lot of fun. I got to try a new technique with a brown oil wash. I had meant to try this out sooner on other models but this is the first one that I had finished that would look good with brown.

The base is my favorite part. Its from Secret Weapons Miniatures and its just a fun base. It almost looks like  the model is ready to jump in (well to me anyway). The base is awesome because I got to play with rust pigments and realistic water all in the same place.


So let me know what you think!