Showing posts with label Diorama. Show all posts

Saturday, April 2, 2016

Wooden Plank Base Tutorial. 


I am working on a model for competition and want it to really stand out. One of the best (or if done poorly worst) ways to highlight your models is to put it on a truly inspiring base. 

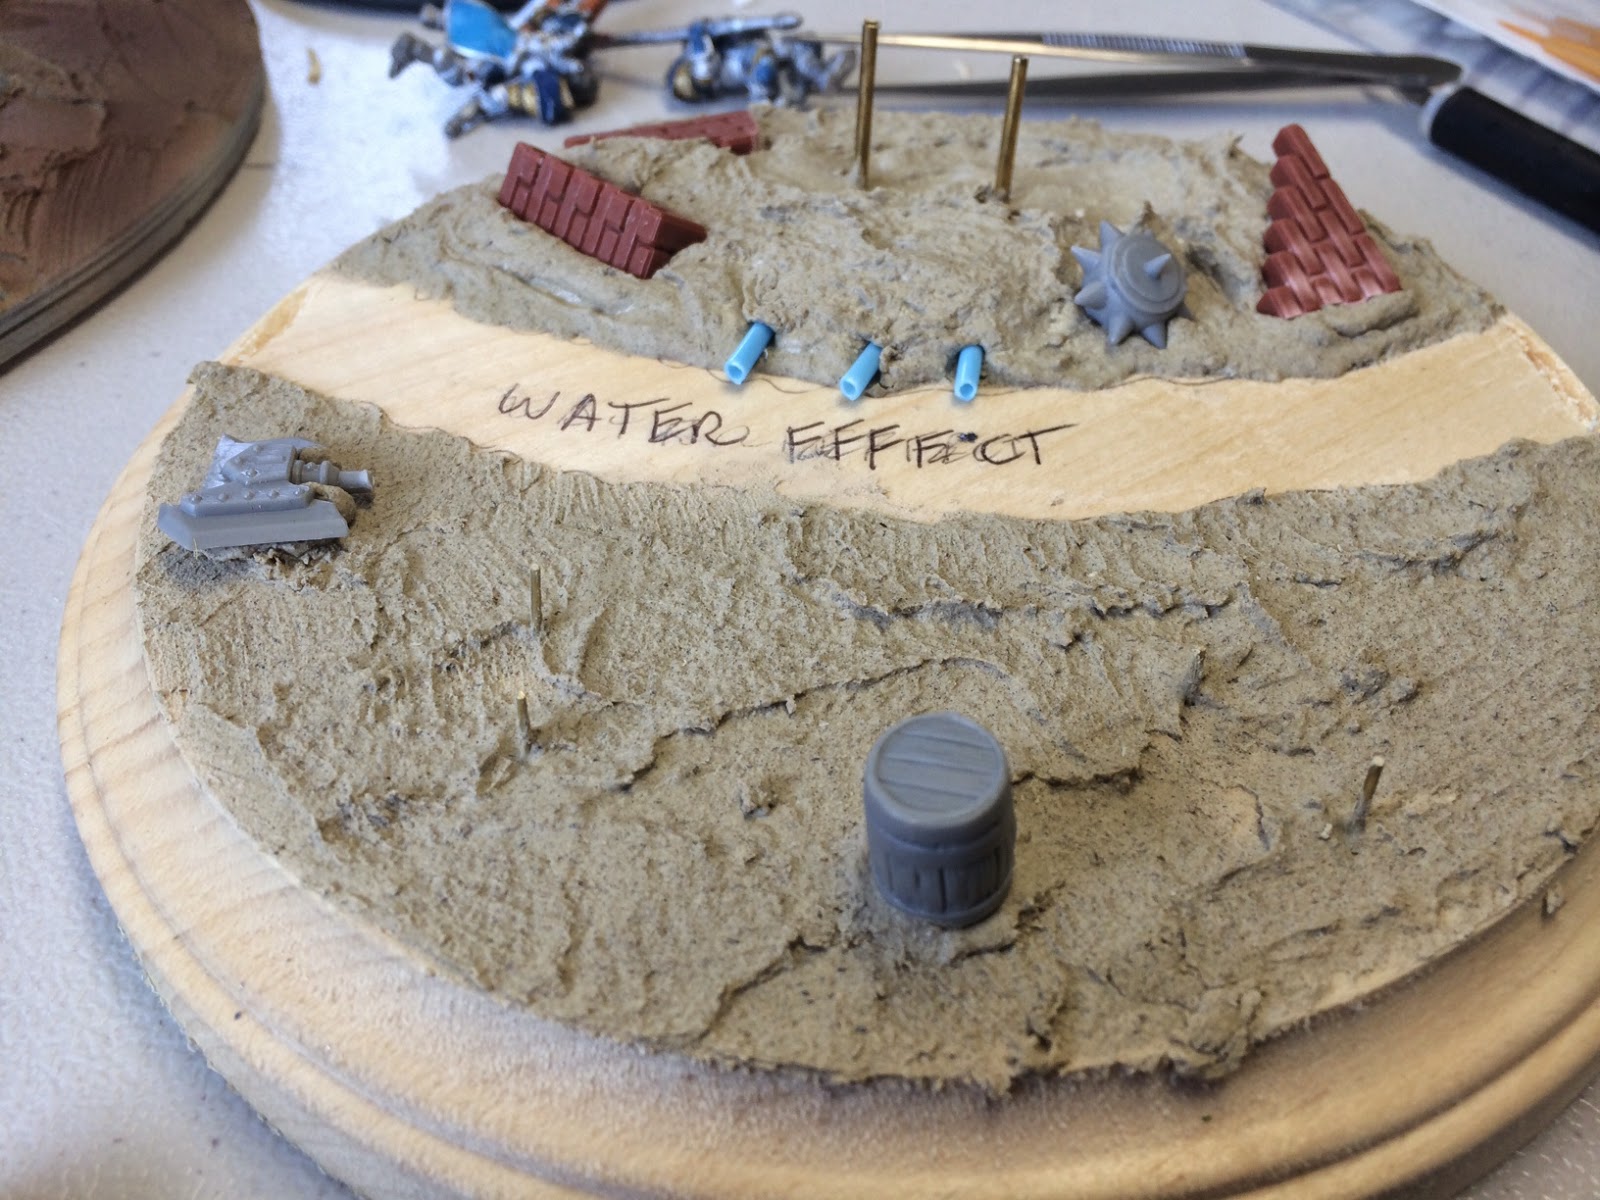
As this is a bigger model and the base size is 120mm (think the size of a DVD) it gives plenty of room for creativity. 

I have always wanted to try a wooden plank road and this was the perfect opportunity. 

First I gathered up the supplies. 

1. 120mm Round Base (came with the model)
2. Wooden stir sticks - I went with the smaller ones as they are more in scale. I picked them up at Hobby Lobby for $2.20. 
3. Air dry clay - The reason for air dry is that you can't bake the plastic base (fumes are bad.....)
5. A sharp knife
6. Bits to fill in the space. 

With the supplies in hand I started by figuring out how many sticks I would need. 


With that sorted out it was time to cut them down to size. To do this I took the model and measured out a few milliliters out from either side to keep it in scale. 


The next step is easy but time consuming. I marked and cut all the other sticks to size. 


Then it was on to dry fitting to make sure (again) that I had enough of them. 


As you can see not all are exactly the same length and that is on purpose. I want the "road" to have a realistic feel to it. 

Up next was breaking out the clay. I picked this stuff up at Hobby Lobby using the 40% off coupon. The really nice thing about this clay is that its nice and moist and really easy to work with. The down side to air dry clay is that it takes about 24 hours to harden and cure. 


Putting the clay on the base was rather simple. I made sure to leave it pretty lumpy to simulate muddy, bad terrain that would need a road of sorts. 


With that step out of the way it was time to lay out the planks. 

The goal was to lay them out in a semi-organized fashion. Enough to make sure it looks like a road but not OCD to the point that it looks unrealistic. 

As a last step I dipped into the bits box to add a bit of eye candy to mud. I used a gears, a shield from a model and the top of a club. 


And now its time to let the whole thing dry and get ready for priming and painting. 


Monday, February 1, 2016

Gorshade the Cursed.

I love the feeling of accomplishment when I finish a model. Then the dread of "what's next?" sets in.....

As to this model, I had a great deal of fun. It was a nice change of pace to work in greens. I tried to show off a good range from very dark to almost yellow, and even if red is the primary contrast color for green I really like how it turned out.

Another really good lesson I learned on this one is how well purple works to shade gold. It's weird but striking at the same time.

Well I hope you like it. I'll be in the corner trying to decide what next to work on.


Thursday, January 28, 2016

Making old timey looking paper for diorama's / display.

We have all seen amazing diorama's with wonderful old time looking paper on them, usually they have some kind of description or saying. They are a great way to break up a mundane piece of wood and add a nice touch of style to the piece.

So how do you make it? Well it's incredibly easy to do.

There are a few things you will need to gather:

1. A piece of paper (duh)
2. Tea  (or coffee in a pinch) brewed.
3. A pan
4. Your oven set to 200 degrees F. (If your from the rest of the word just go and google the conversion calculator).


When you have everything you need. Go ahead and print out what you want to say on the paper (unless you are planning to do the writing by hand later). Personally I have the hand writing of an epileptic 3 year old so I chose to find a font I liked then printed it out.


I then placed the paper in a backing tray that would fit into my toaster oven.


And poured the tea over the paper getting it good and soaked.


I let the paper sit in the tea for a few minutes. I left it long enough for the paper to absorb as much tea as it could hold. Then gently dumped the excess liquid out of the pan.

My toaster oven was warm by then and I placed the cooking sheet with the paper inside and set the timer for 15 minutes (give or take a few minutes).

I let the paper bake till it looked like this.


Then it was just a matter of tearing the paper to the shape you would like.


And now its done and can be glued to the plinth when the model is ready.

So there you go a simple easy trick to take your diorama's to the next level.

Thursday, February 26, 2015

A few things..... This one is gonna be a bit long and rambling and has a few subjects.

Sorry in advance my ADHD is kicking in a bit. Well I don't actually have that but I didn't feel like working on the Butcher/Behemoth diorama and my Karchev model came in the mail the other day and ya'll know how Shiny Object syndrome works....

Anyway. I ordered the Karchev model with no intention of ever actually fielding it on the table, but its such an incredible model that I really want to paint it up. I figured hey why not take the lessons I've learned about building a diorama and see if I can do even better. Off to Hobby Lobby I went to find some things... I grabbed a 10" diameter balsa wood plinth for $1.99 and some wood putty. I already had some plastic brick wall stuff and other things in my bits box. So I walked out of Hobby Lobby for under $10 equipped with what I needed.

First thing I did was put together the model. This thing is all metal and weighs about 2lbs! Its solid and big and lets face it, kinda awesome. The 2 Storm Guard will be added in to the diorama as well so I included them in the picture for scale.


Next up it was time to lay out what I want the diorama to look like. Out came the pen and the bad drawing skills. 


Not sure why this image is staying sideways....

Then it was time to add the first layer of wood putty


You can see that I drilled into the wood and placed brass rods where the modes will be. This will let me slide them on to the pins when all is said and done giving it what I hope will be a seamless look.

Next it I smoothed out the lower side and added in some eye candy.


I used a few Warjack weapons, a barrel ect to add a bit and break up the open ground.

My favorite addition is the pipes coming out into what will be the water down the road. I made these by cutting two Q-tips (ear cleaning things for you non-Americans).

You can also see that the very end of the water part I cut into the wood to give it a bit of a channel. I am hoping that it will keep the water in place without having to add a rim around the entire thing.

Now to let the wood putty dry. Then off to priming and base coating, followed by painting and flocking....


But wait there is more.... Now that I had a few models ready I figured it was time to prime.

I was able to prime Karchev, the Juggernaut from the last post, and a Menoth Redeamer that I picked up for my son.


Last but by no stretch of the imagination least. My Table Scapes tiles finally came. It was a long 2 year wait on the kickstarter but they are amazing. 

My guess is I'll get to them in the next 6 months. 


Tuesday, February 10, 2015

Behemoth Finished!

I was finally able to sit down over the weekend and finish up this model. I really love how it came out. Using inks to create color is just an amazing technique that I plan to use a lot of in the future. The depth of color is just unreal, and it really knocks down the airbrushed look. I wish I were able to take a picture that truly captures just how rich and deep the color is.

The base is very basic and bland, and there is a reason for it. It is made to fit into the diorama that I am working on. So please judge the model without the base.

I cant wait to get another model and try to make it even better using inks.

Also I want to give a HUGE shout out to my Patreon donations Thank you for helping make this possible. I would ask if anyone else is willing to pitch in. I have ideas of bigger and better things but can only do it with your help. If you can spare a dime please do here My Patreon every dime of this goes to models, paints, brushes etc. Nothing in my pocket it all gets put back into the blog and eventually a YouTube channel when I can afford the equipment to do it.

So have some pictures and scroll all the way to the end for a spoiler of whats up next.


Here he is on the diorama base 


And the spoiler I promised.


Friday, January 30, 2015

Diorama 7.75

To answer your first question, Yes my numbering system is completely arbitrary.

OK, that out of the way. I was actually able to sit down for a few hours and paint! Behemoth's matte varnish had dried over night and so the hair brushing could now begin.

I used Vallejo Game Color - Black, and yes you are correct I have repeatedly said to not use strait black on your models. Always go a shade lighter. You are correct, however the black in this case is needed and will be highlighted up to the point of not really even noticing it was strait black to start with.

Then it was on to the metallic colors. The silver is Vallejo Model Air Chrome. I wanted the silver to be really bright and shiny so when it is knocked down with a wash or two it still has a bit of a gleam to it.

The brass..... Oh the brass. I started out with Vallejo Game Air Brassy Brass and I am honestly disappointed in it. The coverage is still fantastic but it is way to brown. I mixed it with about 2:1 Vallejo Model Color - Brass and it gave me a good mid-tone brass. Then it was time for a quick wash. I used Vallejo Game Color - Sepia Wash as a first wash to bring down the silver and brass.

Now to let it dry. and then it will be time to work on details like highlighting the black, adding battle damage and washing it again.

So here have some pictures.


Wednesday, January 28, 2015

Diorama 7.0 - The Highlights.... Oh the Highlights.

I had a few minutes after class (so read about 10pm last night) to work on this model a bit more. I was able to add the second highlight (well first over color). I used Vallejo Model Color - Light Skin Tone mixed at 1:2 with water, and very slowly applied the highlight to the raised areas. I can honestly say I am just astounded at how well this technique works. The depth of color is just insane (I think I said that after the last coat too but man it's true).

To give you an idea, there is no direct light on this model. the "shine" is all paint.

Up next will be a very light coat of red ink to smooth out the highlights and then its on to the blacks, golds, silvers etc.....


Monday, January 26, 2015

Diorama 6.0 - Behemoth!

I have watched Les over at Awesome Paint Job paint this model and I found his technique amazing. using inks to create a fantastic depth of color on the model. I decided that if I am going to do this thing I am going to do it right and use every trick I have learned to produce the absolute best models I can.

I started with Vallejo Grey Surface Primer and after curing I used Vallejo Model Color Dark Grey as my base color. I then used Vallejo Game Color Stone Grey for the highlights on the model.


Then it was time to play with the Ink. I only have P3 red ink at my disposal right now. I played with it through my Badger Krome given that it has a very small needle (0.2mm) and I can shoot it at a much lower psi. I found that 10psi was the "sweet spot". I used about a 1:1 mix of P3 Red Ink and Vallejo Airbrush Thinner. The depth of color after just one coat of red ink is already astounding. 


I've just coated it with a Tamiya Matte Varnish and once dry I will start the second layer of highlights using a soft skin tone. 

Stay tuned I have a feeling this will be the best model I have ever produced. 


Sunday, January 25, 2015

Diorama 5.0. If a tree gets Greens Stuffed in the forest.....


Ok bad joke opening aside. I finally had a few moments between work, school, and kids to get just about an hour of hobby time in today.

I wanted to get the Tree sculpted at least. I mixed up some GS and basically just wrapped up the twisted pairs of wire in as thin of a coat of GS as possible. Some places I made a bit thicker to try and simulate knots and stuff like that. This is my first time trying anything like this and I don't think it came out half bad.

Not to let it dry and then paint it up real quick and be done with this part.