Lessons Learned Part 2.
It has been quite a while since I posted about what I have learned about airbrushing and painting models in general. As I have not really had much time over the last few weeks to really work on models I feel that it is a good time for reflection.
1. PSI. When I first started airbrushing I think I was spraying at something like 30psi or above though my Patriot 105. It was impossible to do any kind of detail work and I was wasting a good deal of paint. I figured out pretty quickly that with properly thinned paint I had much more control and used so very much less paint. I now spray paint at 10-15psi and inks at around 5psi (inks are another lesson further down the page).
2. Thinning. I was one of the folks that fell for the VMA "you can spray it right out of the bottle" line. You can.... but for better results I have found that mixing VMA at 1:1 is about right. For others like GW, P3, VGC, VMC ect I mix at 3:1 (paint to thinner).
3. Nozzle size. At first I only had the Badger Patriot 105 with its 0.5mm nozzle. It is a true workhorse and I still use it for priming models, large models and terrain. For just about everything else I now use a Badger Khrome. I love the Khrome it has a 0.2mm nozzle and can do some astoundingly fine detail work. I really like being able to get a specific color into a tight area without too much over spray.
4. Trigger Control. Being able to control both the air pressure and the paint flow is a blessing now. When starting out it was more of a curse. Oh how many times did I mess up a perfectly good paint job by not having a good feel for my airbrushes and hitting it just a bit too hard. I would recommend practicing till you "just know" how hard or soft to pull back and push down on the trigger.
5. Inks. I have only recently discovered the amazing power of using inks though an airbrush. I love using its transparency to my advantage. I am a huge fan of being able to build up the highlights with ease and having it look so very seamless. I use both Dalor Rowney - FW and P3 inks. The Dalor Rowney tend to be a bit darker and are great for the first coats to give the model really dark shadows and the P3 are very bright and extremely useful for the last coats to smooth and blend the highlights.
6. Cleaning. Proper maintenance of equipment is not just for airbrushes. However we are talking airbrushes so I might as well stay on topic. I have found that a proper cleaning and lubing will prevent so very many headaches that it is worth the time after every session. For most applications a basic cleaning of taking out the needle, removing the nozzle housing and nozzle cleaning them and the cup of paint, then a thin coat of lube on the needle and screw in parts is all you need. When dealing with inks I have found it very important to break down the entire brush for a deep down cleaning (the stuff just gets everywhere).
7. I'm still a beginner. I feel like I have learned so much over the last year and a half, but have so very much more to learn. My goals over the next 6 months are to learn more traditional blending, and to work with smaller models. I still have no idea how some of the folks on YouTube can paint an entire model with just an airbrush, but hey, ya never know where I will be in a year or so.

A somewhat humble blog about painting and photographing miniatures. I strive to entertain and maybe make your day a bit better!
Saturday, June 20, 2015

Thursday, June 11, 2015
Ruin 3.0 - The inking continues....
Hey sports fans. This is just a quick update as I have not had much time to work on painting over the last few days (silly school, work, family getting in the way.....)
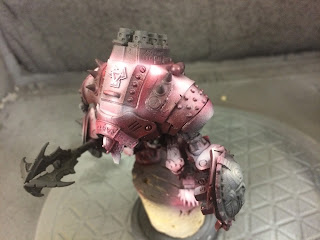
I was able to get the second layer of ink onto the model. Just to refresh your memory I used a P3 - Red Ink for this layer. It has a bit more of an Orange tinge to it which balances out the pinkish/purple of the FW - Red Ink of the first layer. I find that when using both it gives a very nice rich red color.
As you can see in the pictures below if we have done the job right using the inks and highlight colors underneath we have achieved a really nice contrast between dark and light. For these pictures there is no light directed at the model. You are seeing the highlights that simulate where the light would hit the model.


After the ink was fully dried I coated the model (where the inks were applied only) with a gloss varnish. This step is critical to seal in the freshness, well to keep the ink in place as it will rub off and interact with the paints that will be applied later if its not sealed properly.
Up next I am going to tape off around the buckler on the left hand, the club in the right, and the ruins around the head. I am basically going to repeat the process of what I did with the reds, but will use greens to give it a glowing look. Something like an OSL but without the light source shining onto the model itself. I hope to get an almost ethereal glow if I do it correctly.
Wednesday, June 10, 2015
Ruin 2.0 - The inks have landed.
First and foremost, this model is just fantastic. I think I have gushed over it a bit to this point, but it does need some more praise, The lines are smooth, the larger open surfaces are curved to capture the light just right. and the detail is fantastic for PVC.
Back to the topic at hand. I gave the primer a full 24 hours to dry. I have found that Vallejo Surface Primer is fantastic stuff but it needs a while to fully cure. I am pretty sure that I would be fine leaving it for 8 hours or so but over night works well so why mess with it? I then gave the model a quick coat of Vallejo Model Color - Grey/Black. The darker undercoat is critical for the highlighting effect I am using, Don't worry about the Grey/Black being a bit too light as the shadows will be darkened later with washes.

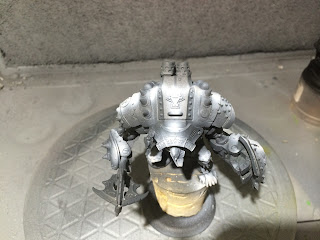


So here we are at the end of a bunch of pictures.
Next up I will add the second ink layer using P3 - Red ink. I use the P3 for the second coat as it has a bit more of an orange tint and will blend well with the layers underneath to give a vibrant red look to the model.
Stay tuned, This will be a very ambitious paint job as I will be doing a bit of the same technique but in green on the shield, mace and runes around the head. Should be fun.....or maybe just leave me crying in a corner, only time will tell.
Oh and I got the base primed and blacked for the dry brushing to follow.

First and foremost, this model is just fantastic. I think I have gushed over it a bit to this point, but it does need some more praise, The lines are smooth, the larger open surfaces are curved to capture the light just right. and the detail is fantastic for PVC.
Back to the topic at hand. I gave the primer a full 24 hours to dry. I have found that Vallejo Surface Primer is fantastic stuff but it needs a while to fully cure. I am pretty sure that I would be fine leaving it for 8 hours or so but over night works well so why mess with it? I then gave the model a quick coat of Vallejo Model Color - Grey/Black. The darker undercoat is critical for the highlighting effect I am using, Don't worry about the Grey/Black being a bit too light as the shadows will be darkened later with washes.


I helped the undercoat dry a bit faster using strait air out of the airbrush and then it was time to add the first layer of highlights. For the first highlights I use Vallejo Game Color - Stone Grey. Its a good contrast to the Grey/Black and it can get very "bright" without having to go up through white.
Next up was the first layer of ink. I used the D&R -FW Red Ink. This stuff is amazing and can be found at Hobby Lobby for about $4 with a coupon. One pot should last you years. To give a bit of perspective I used 5 drops for this layer.


As you can see the first layer of inks leave just a bit of the highlights showing through underneath, It's a good layer to build upon. You may also notice that the ink is a bit on the pinkish/purple side after drying. This is fine and we can use it to our advantage in the next steps.
For the second highlight layer we want to add a bit of "warmth" to our colors. I used a mix of Vallejo Model Color - Flat Flesh and Vallejo Model Color - Carmine Red at a ratio of 10:1. This is a pretty good mimic of Vallejo Model Color - Bright Flesh (which is about impossible to find for some reason). You want to go a bit bigger on this highlight stage, go really bright on the spots you want to really show though. I would recommend shining your painting light down on the model to really get a feel for where the light hits the model. This will tell you were your highlighting should be focused.


So here we are at the end of a bunch of pictures.
Next up I will add the second ink layer using P3 - Red ink. I use the P3 for the second coat as it has a bit more of an orange tint and will blend well with the layers underneath to give a vibrant red look to the model.
Stay tuned, This will be a very ambitious paint job as I will be doing a bit of the same technique but in green on the shield, mace and runes around the head. Should be fun.....or maybe just leave me crying in a corner, only time will tell.
Oh and I got the base primed and blacked for the dry brushing to follow.

Monday, June 8, 2015
On to the next model - Ruin!
I have been waiting eagerly for this model to come out for a while now. It was finally released in May and I gotta tell you. I have not been this excited about a model in a long time. Ruin looks to me like everything Warmachine should be. It's big, menacing, has a huge club and is heavy. I am in miniature heaven right now.
I wanted something a bit epic for the base. I feel like putting something like this on a a bit of flock and sand is almost a crime. So off to the internet I went and found what I wanted from Armor Cast. I got the old Roman bridge base. Its almost 2 inches tall and fantastically detailed. Add the fact that it was like $6 and we have a winner.
Shipping from Armor Cast took about a week which is not bad at all.
So I got the model put together over about 2 hours. It was not the simplest thing to get into one piece. With PP penchant for models that have both resin and metal together pinning is a necessity. Then I assembled the bridge to a 50mm round base using the glue and green stuff method. And am using a large piece of cork to hold the model.


Primer has been applied. Now for the long (well overnight) wait for the primer to dry so I can get this one on the painting table.
I have been waiting eagerly for this model to come out for a while now. It was finally released in May and I gotta tell you. I have not been this excited about a model in a long time. Ruin looks to me like everything Warmachine should be. It's big, menacing, has a huge club and is heavy. I am in miniature heaven right now.
I wanted something a bit epic for the base. I feel like putting something like this on a a bit of flock and sand is almost a crime. So off to the internet I went and found what I wanted from Armor Cast. I got the old Roman bridge base. Its almost 2 inches tall and fantastically detailed. Add the fact that it was like $6 and we have a winner.
Shipping from Armor Cast took about a week which is not bad at all.
So I got the model put together over about 2 hours. It was not the simplest thing to get into one piece. With PP penchant for models that have both resin and metal together pinning is a necessity. Then I assembled the bridge to a 50mm round base using the glue and green stuff method. And am using a large piece of cork to hold the model.


Thursday, June 4, 2015
Blighted Bather - Finished.
First let me say I love this model. It was so much fun to paint up. I really like all the little details like the bubbles in the cauldron, and the rock like things on her right shoulder, and seriously,.... How cool is the rubber ducky shredder?
I am really glad the client wanted this in a "normal" skin tone. I think it lent great contrast to the other colors.
All that being said. I am still learning to use the new camera and more importantly (and aggravatingly) how to edit said photos. If anyone has a good tutorial out there for Light Box or Photo Shop or any other great piece of software please let me know in the comments.
Here are a few pics.


Also not sure what that smudge on the light box is but that needs to go away.
Thursday, May 21, 2015
Pinning. What is it and why you should do it.
Let's take a moment or three to talk about pinning. If you are putting together metal or resin models you should really be pinning. Here are a few reasons why it makes sense to do so.
1. It keeps that pesky hand/arm/head/backpack etc from falling off on the game table.
2. Number 1 is especially frustrating when it chips the paint.
3. Geez now that I have glued the arm back onto my already painted model I have glue everywhere ruining the paint job I just spent 10 hours on....
4. It's a great way to have something to hold onto if you are painting your models before assembly.
So how do you pin you ask? Pretty easily really. There are a few things you will need to get started.
A good jeweler's pin set. I personally use the P3 version as it's under $10 and the drill bits have been stayed the sharpest and broken the least of the ones I have used. GF9, Army Painter and GW all sell them as well. PRO TIP- STAY AWAY FROM THE GW BRANDED ONE. It cost 3 times as much for the same darn thing. Don't through your money away buy some shiny models with it.
Most of the pin vices come with a few different sized drill bits and a bit of brass rod. I find for most 28mm models that the 0.85mm drill and rods are the right size for the job. If you are going to pin something big and heavy, I use the 1.5mm stuff.
You will also need a good pair of snips. For the longest time I just used an old nail cutter and that worked well for 0.85mm and below. If you are going to pin with anything bigger I would recommend getting a good set of metal snips. Again you can buy these from all the miniature companies, but why pay $20 for something you can pick up at Home Depot, Lowes, Menard's ect for under $10?
I'd like to also talk about using pinning to your advantage during modeling/painting.
I am working an a PP model for a client called the Blighted Bather. This thing is tiny. The body is white metal and the cauldron is resin. I don't know about you but to me that sounds like a disaster waiting to happen if I had just glued it all together.
I started like every other model, cleaning off mold lines and snipping off the odd spru/extra bit of metal. Then it was time to figure out where and with what to pin.
If you look at the model you can see that the metal legs go into the resin and the torso of the model goes into it as well. The "rubber ducky" sits on the base. As I am using a scenic base the ducky will be put into one of the recesses and will have clear resin applied around it to simulate water keeping it secured. I pinned it anyway so that I have something to hold it onto the cork. I then figured out the angle to pin by placing the pieces together and using the drill as a guide. Then its just a matter of drilling into the different pieces. Once the legs and torso have their pins. I take a dab of bright paint and put it on the end of the brass rod, and use the pin as a guide placing it down on the bit that it will be pinned to. This gives me a target to drill into. Drilling then becomes easy. Just make sure to make your hole deep enough 1/8th" should do. For priming and painting I like to put filler rod into the drilled holes. This will keep them free of paint and let me find them easily. Pro Tip - don't glue in your filler rods, just place them in the holes as you will need to remove them later.
Ok here are some pics of what I am talking about.

Here is the pin vice and a leg that is about to be pinned.

Here you can see the legs pinned and the place holder pins in the cauldron.

This has the torso and the ducky on pins in the cork ready for priming and painting.
Well there ya go, Pinning is not hard and it will save you so very much hassle down the road. Please add some comments and questions.
Wednesday, May 13, 2015
Thagrosh Painter of Everblight DONE!!!
Wow, what an amazing model. This one was really fun to paint. I got to try a few new things like using two oil washes of different colors over each other (blue followed by purple) (also a third if we count the burnt umber on the cape) and I think I have the two brush blending down pretty well (see the cape).
I also took the pictures using the new camera. The pictures look fantastic on my computer so hopefully that translates to the blog.
All in all an fantastic model that I will actually be kinda sad to give to it's owner and not put in my display case.
Please, please, please leave some feed back, on the pictures and the model.


Subscribe to:
Posts (Atom)