Lessons Learned Part 2.
It has been quite a while since I posted about what I have learned about airbrushing and painting models in general. As I have not really had much time over the last few weeks to really work on models I feel that it is a good time for reflection.
1. PSI. When I first started airbrushing I think I was spraying at something like 30psi or above though my Patriot 105. It was impossible to do any kind of detail work and I was wasting a good deal of paint. I figured out pretty quickly that with properly thinned paint I had much more control and used so very much less paint. I now spray paint at 10-15psi and inks at around 5psi (inks are another lesson further down the page).
2. Thinning. I was one of the folks that fell for the VMA "you can spray it right out of the bottle" line. You can.... but for better results I have found that mixing VMA at 1:1 is about right. For others like GW, P3, VGC, VMC ect I mix at 3:1 (paint to thinner).
3. Nozzle size. At first I only had the Badger Patriot 105 with its 0.5mm nozzle. It is a true workhorse and I still use it for priming models, large models and terrain. For just about everything else I now use a Badger Khrome. I love the Khrome it has a 0.2mm nozzle and can do some astoundingly fine detail work. I really like being able to get a specific color into a tight area without too much over spray.
4. Trigger Control. Being able to control both the air pressure and the paint flow is a blessing now. When starting out it was more of a curse. Oh how many times did I mess up a perfectly good paint job by not having a good feel for my airbrushes and hitting it just a bit too hard. I would recommend practicing till you "just know" how hard or soft to pull back and push down on the trigger.
5. Inks. I have only recently discovered the amazing power of using inks though an airbrush. I love using its transparency to my advantage. I am a huge fan of being able to build up the highlights with ease and having it look so very seamless. I use both Dalor Rowney - FW and P3 inks. The Dalor Rowney tend to be a bit darker and are great for the first coats to give the model really dark shadows and the P3 are very bright and extremely useful for the last coats to smooth and blend the highlights.
6. Cleaning. Proper maintenance of equipment is not just for airbrushes. However we are talking airbrushes so I might as well stay on topic. I have found that a proper cleaning and lubing will prevent so very many headaches that it is worth the time after every session. For most applications a basic cleaning of taking out the needle, removing the nozzle housing and nozzle cleaning them and the cup of paint, then a thin coat of lube on the needle and screw in parts is all you need. When dealing with inks I have found it very important to break down the entire brush for a deep down cleaning (the stuff just gets everywhere).
7. I'm still a beginner. I feel like I have learned so much over the last year and a half, but have so very much more to learn. My goals over the next 6 months are to learn more traditional blending, and to work with smaller models. I still have no idea how some of the folks on YouTube can paint an entire model with just an airbrush, but hey, ya never know where I will be in a year or so.

A somewhat humble blog about painting and photographing miniatures. I strive to entertain and maybe make your day a bit better!
Showing posts with label Renegade. Show all posts
Showing posts with label Renegade. Show all posts
Saturday, June 20, 2015

Friday, September 19, 2014
Knight Titan 9.0 - Oil, oil everywhere....
Well I got home after what was supposed to be a 24 hour shift that turned into 36 hours between both jobs (gotta keep them kids fed). I'm tired but really wanted to get some work done on the Titan.
I hit the parts with Testers Gloss Coat. It's the best thing out there when it comes to gloss coats and you want something very strong and durable when you are about to make an oil based wash so as not to eat the paint underneath.
I chose to go with a really orange oil wash on this one to highlight the rust. I want a brighter rust to contrast the purple and stand out. It also sets a good tone for the next step in the process....... Powders.
So I used this stuff.




Well I got home after what was supposed to be a 24 hour shift that turned into 36 hours between both jobs (gotta keep them kids fed). I'm tired but really wanted to get some work done on the Titan.
I hit the parts with Testers Gloss Coat. It's the best thing out there when it comes to gloss coats and you want something very strong and durable when you are about to make an oil based wash so as not to eat the paint underneath.
I chose to go with a really orange oil wash on this one to highlight the rust. I want a brighter rust to contrast the purple and stand out. It also sets a good tone for the next step in the process....... Powders.
So I used this stuff.
I got it from Hobby Lobby with the 40% off coupon for something like $5. This is probably more than I and 10 friends could ever hope to use, but oils never dry out so its all good.
I grabbed about a 2mm round balls worth of the stuff out and mixed it with Odorless Mineral Spirits to make the wash. I wish I could give you a ratio but I can't. How I do it is I mix it nice and thin to the point of some translucence, then blot it on a paper towel. If it spreads out in a nice spider pattern I know its good to go.
I started applying the oil wash on the turtle top thing and let capillary action bring it down into all of the nooks and crannies (another bonus to gloss coat).
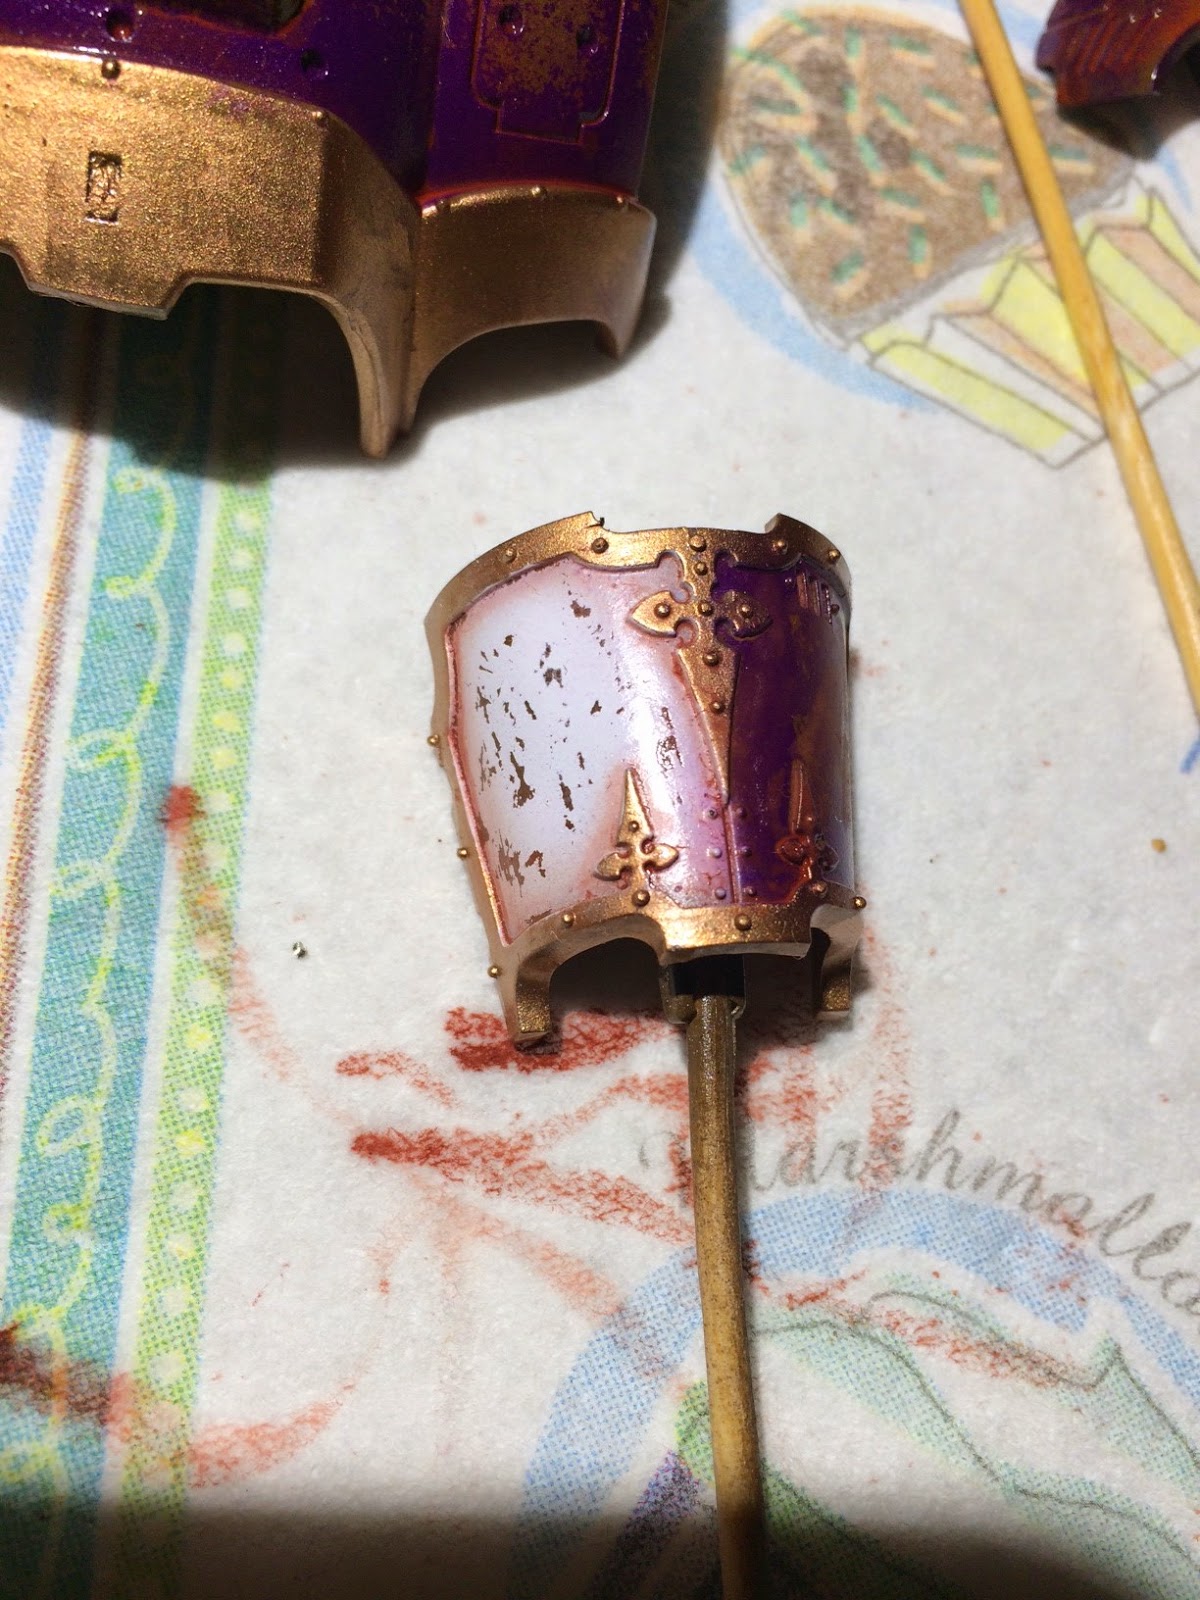
You can see how the orange of the wash really brings out the browns of the rust already.
Then it was onto the leg guards. Now with whites you have to be really careful as you cant just smear it all over and hope for the best. I applied it mostly around the edges and it will set up the powders better on these.
Same thing with the white on the mask, but I did go with a heavier wash on the silver hear.
Here is a shot of the legs and torso for good measure too.
And now its time to wait for the oils to dry at least over night. Oils take a very long time to dry (oil paintings on canvas take YEARS to cure). So a day is nothing in comparison.
Sunday will be a day of assembling the whole thing, then adding powders and sealing it all up.
Then onto the base.....
Wednesday, September 17, 2014
Quick diversion from the Knight Titan.
I have really cool, no strike that, amazing news! I had heard about the new Vallejo paint line Vallejo Game Air that is just about to be released. Game Air is a complementary line to Model Air but with the same bright colors as the Game Color line (like the old GW). I contacted Vallejo and they were extremely kind and offered to send me samples to review. Well the paints showed up at my door step today and besides getting to see the wife and kids after 36 hours on shift it was the second best thing putting a big ol grin on my face.
I asked for and received the following colors:
72.701 Dead White
72.705 Moon Yellow
72.709 Hot Orange
72.711 Gory Red
72.270 Imperial Blue
72.721 Magic Blue
72.740 Leather Brown
72.743 Beasty Brown
72.725 Dead Flesh
72.753 Chainmail Silver
72.754 Gunmetal
72.756 Glorious Gold
72.757 Bright Bronze
72.758 Brassy Brass
72.761 Khaki
70.510 Gloss Varnish (this is the same as what is currently offered but I had thought it was new for the Game Air line).
This is a good assortment and should give me a good test on a project to really put these through the paces. After I finish up the Knight Titan of course.
So readers I put it to you, what shall we try these paints on? I have Privateer Press WarJacks, Hordes WarBeasts, lots of single models from PP, or an old metal Lictor from GW. Let me know what you think I should paint in the comments.
I'll be off after another 24hr shift tomorrow and hopefully I should have the last installment (read finished!) of the Knight Titan up on Sunday night.
Wednesday, September 10, 2014
Knight Titan 5.0
Just a quick update tonight. I was supposed to work a 24hr shift and it turned into working 36 plus hours instead.
I was able to tape off and get the Steel down on the torso and legs. I am currently using Vallejo Model Air Aluminium and it's by far my favorite of all the silvers that I own. It leaves an incredibly smooth finish and just looks like real metal. I also really like how the sliver and purple look together.


Just a quick update tonight. I was supposed to work a 24hr shift and it turned into working 36 plus hours instead.
I was able to tape off and get the Steel down on the torso and legs. I am currently using Vallejo Model Air Aluminium and it's by far my favorite of all the silvers that I own. It leaves an incredibly smooth finish and just looks like real metal. I also really like how the sliver and purple look together.
I have another 24 hour shift tomorrow so I should have a much bigger update with quite a bit of progress on Saturday.
Up next I am going to tape off all the fiddly bits on the arms to finish up the silvers. Mask off the "face" and get a good glow coming out of the eyes. Then the mask (that covers most of the face) will get a really bright yellow or an off white (haven't decided yet). For the banner I am leaning towards yellow and black caution stripes. That should finish up the airbrushing side of this project then onto the regular brush.
Monday, September 8, 2014
Knight Titan 4.0
Oh yea. I'm back from a 24 hour shift and I got to rock and role on the Knight Titan a bit.
The gloss varnish was dry and ready to go. I sprayed everything down with hair spray (Please let me say this again, you have to use cheap hair spray. The good stuff just doesn't work. Go down to the dollar store and get a huge can of Aqua Net, it will last you forever and does not smell half bad!). The hair spray needs time to dry, like a few hours time. It will dry a bit sticky and that is just fine.
As an aside I have seen tutorials where people spray the hairspray from the aerosol can into a medicine cup and then put it into the airbrush to aerosol it onto the model. I'm not sure why they do this as its kinda the same thing and looks like a few extra steps including breaking down your airbrush for a deep cleaning.
Ok let's get back on track. I taped off things that needed taping off with Tamiya painters tape. It's low tack and the best stuff for models around. I generally use the 0.25in but it comes in bigger sizes as well.
Then it was time to put the first coat down. I went with Lytch Purple from the old GW line. It's a really nice regal purple and its the only one I had on hand. One lesson learned is that purple is really bad at covering orange and needed a few more coats than I had anticipated.


You might also note that I only sprayed half the leg guards with purple the other half will be another color but you will have to wait and see what that one will be.

So what's next you ask? Well I am going to let this all dry over night and spend some time with the wife before my next 24 hour shift tomorrow. After that I will start working on blending in some dark red on the purples and see if we can get a good smooth blend/transition so that we get a good deep red on the higher pieces. From there I will get to the silvers. and the other colors.
Stay tuned. More to come this week.
Oh yea. I'm back from a 24 hour shift and I got to rock and role on the Knight Titan a bit.
The gloss varnish was dry and ready to go. I sprayed everything down with hair spray (Please let me say this again, you have to use cheap hair spray. The good stuff just doesn't work. Go down to the dollar store and get a huge can of Aqua Net, it will last you forever and does not smell half bad!). The hair spray needs time to dry, like a few hours time. It will dry a bit sticky and that is just fine.
As an aside I have seen tutorials where people spray the hairspray from the aerosol can into a medicine cup and then put it into the airbrush to aerosol it onto the model. I'm not sure why they do this as its kinda the same thing and looks like a few extra steps including breaking down your airbrush for a deep cleaning.
Ok let's get back on track. I taped off things that needed taping off with Tamiya painters tape. It's low tack and the best stuff for models around. I generally use the 0.25in but it comes in bigger sizes as well.
Then it was time to put the first coat down. I went with Lytch Purple from the old GW line. It's a really nice regal purple and its the only one I had on hand. One lesson learned is that purple is really bad at covering orange and needed a few more coats than I had anticipated.
Group Shot
The Back
Carapace and Chain Sword
Shield
Dem Leg Guards!
So what's next you ask? Well I am going to let this all dry over night and spend some time with the wife before my next 24 hour shift tomorrow. After that I will start working on blending in some dark red on the purples and see if we can get a good smooth blend/transition so that we get a good deep red on the higher pieces. From there I will get to the silvers. and the other colors.
Stay tuned. More to come this week.
Saturday, September 6, 2014
Knight Titan 3.0
Yea I know it's quite a few updates to the blog for one day. In my defence its been a long time since I have had a whole day to actually build and paint something. That and I am really excited about painting this thing.
So I got the first brown of the rust down. I used Vallejo Model Color German Brown. It's a really nice dark mustard brown. Looks like what mud should.


I gave this coat about an hour to dry then it was on to the orange of the rust. I used the Old Fire Dragon Orange from GW mixed about 5:1 with VMC Mahogany Brown. I'm going with a very bright rust because the base colors will be purple and red. I need something that will stand out but still look like rust.


Now to wait a few hours and let everything get nice and dry. Then I will add a heavy gloss coat and call it good for the night.
Thanks for reading. More to come in a few days.
Yea I know it's quite a few updates to the blog for one day. In my defence its been a long time since I have had a whole day to actually build and paint something. That and I am really excited about painting this thing.
So I got the first brown of the rust down. I used Vallejo Model Color German Brown. It's a really nice dark mustard brown. Looks like what mud should.
I gave this coat about an hour to dry then it was on to the orange of the rust. I used the Old Fire Dragon Orange from GW mixed about 5:1 with VMC Mahogany Brown. I'm going with a very bright rust because the base colors will be purple and red. I need something that will stand out but still look like rust.
Thanks for reading. More to come in a few days.
Sunday, April 13, 2014
Badger 2.0 (Krome)
I'm just about giddy right now. The owner of the FLGS that I go to was at Adepticon and happened to go by the Badger Airbrush booth. They were selling airbrushes and had the Krome for $80!!! Being the amazing guy he is my friend grabbed one for me.
So yea pretty much Christmas in April for this guy.
I'm excited to try this bad boy out and see just how fine I can get the detail through this airbrush. I'm just waiting on Amazon.com to deliver the hose adaptor and another quick release.
In the meantime enjoy some airbrush porn...
The Krome is at the top and the Patriot 105 is there because it rocks too.


I'm just about giddy right now. The owner of the FLGS that I go to was at Adepticon and happened to go by the Badger Airbrush booth. They were selling airbrushes and had the Krome for $80!!! Being the amazing guy he is my friend grabbed one for me.
So yea pretty much Christmas in April for this guy.
I'm excited to try this bad boy out and see just how fine I can get the detail through this airbrush. I'm just waiting on Amazon.com to deliver the hose adaptor and another quick release.
In the meantime enjoy some airbrush porn...
The Krome is at the top and the Patriot 105 is there because it rocks too.
Subscribe to:
Posts (Atom)